System administrator
System Maintenance
Scheduled Messages
Modify message
Create message
Scheduled messages
Message frequency options
Report selection
Email settings and troubleshooting
Send one-time message
T&A Web
UK & IRE time change instructions
T&A instructions for UK & IRE Time Change - October 2026
FES Instructions for UK & IRE Summer Time Change – October 2026
Dashboard Maintenance
Profile maintenance
Tab maintenance
Dashboard maintenance
Reports widget
Widget maintenance
Widget public URLs
Themes and Dashboard
Modifying and deleting a created Theme
Dashboard background
Creating a Theme
Custom login logos
Active Themes
Progress Indicator
Theme
Calendar Maintenance
Create calendar
Calendar profiles
Calendar data types page
Calendar maintenance
Creating a Calendar data type
Payslip Management
Kiosk
Kiosk details
Kiosk Configuration
Modify action
Kiosk site planner
Kiosk log
Modify Kiosk preferences
Preparing to install Kiosk
Terminal Site Planner
Deactivate and Reactivate the terminal webpage
Upgrade Terminal Firmware on 900 series or Access Control Unit via Web Service
Terminal upgrades
Terminal Site Planner
Poller preferences
Terminal Actions
Job Scheduler
Poller log
SAML Authentication
Licensing
Licensing upload errors
Upload T&A 8 License Instructions
Temporary Licence
Version Number Mismatch
Licensing
Request a Licence
Upload a Licence
Employee License
Messages Received
Enroller
Language Maintenance
Profile language
Importing and Exporting phrases
T&A Error phrases
Language maintenance
Culture maintenance
Advanced T&A Products Minimum IT Specifications
Configuring T&A for use with Microsoft Exchange Online
Support Knowledge Base
Clearing Anomalies - Start a New Period End
T&A 8 licence expiry and renewal
Adding and changing Users in WINTMS
Full Rights for New User
AutoID Badge designer
Delete a Finger Template
Need to Create a Report With a Date Prompt
T&A - European Working Time Directive Features
How to Change the Name Displayed on the Terminal
Client Install instructions
How to Download an Employee to the Terminals
Browser Changes Affecting Time and Attendance RD Web Access
Create New User
Changing the IP Address on a Mitrefinch 900 Series clock or Access control unit.
Employee in TMS but not in HR Manager
GPS clocking location from a mobile phone
Report That Shows if the Employee Has a Photo
Obtaining "500 internal server error" details
Spring Time Change - North America
How to Unlock a User
Support is Evolving
Data Assurance Module - Identifying and preventing the accidental deletion of data (TMS versions 8.33.0.0 and below)
.NET Framework 4.8 for T&A (version 8.35.0+)
'Use Only Once' Checkbox on Book Absence Screen
Changing the OT Threshold for OT Hours Calculation
Poller Keeps Going Down
Help with Australian ADP Export Coding
The Basics
Change Culture
Supervisor Basic Operations
Apply assumed clocks
Changes to hierarchical Security
Adding an additional day of credit
Invalid Login
T&A Entitlement Year End Procedure - Hosted by OneAdvanced
T&A Entitlement Year End Procedure - On premise
Logging in and out as an Employee
Apache Log4j CVE-2021-44228 "Log4Shell" vulnerability
Employee basic operations
TMS Apps
Logging in: the Help button
Adding a keyed absence
Logging in as a Supervisor
Error tGlb.GetPkg
General navigation
COVID 19 - How to manage staff working from home
SAML Authentication in TMS 7
Auto-Rostering - User Admin/Supervisors
Auto-Rostering overview
What data is synced from Time & Attendance to Auto-Rostering?
Schedule Setup
Manage Schedules
Solving a Schedule
Schedule Approval
Employee and User Management
Reporting
Employee Confirmations
Dashboards
Frequently asked questions - Auto-Rostering
T&A Data Share
Identity by OneAdvanced
Understanding Identity with T&A
Introduction to Identity
Identity by OneAdvanced - Platform guidance
Identity FAQs
Choose your authentication method (Federated vs Non-federated)
Managing multiple access needs
Employees without email addresses
What do I need to know?
Managing Identity
Leavers, rejoiners and deleting employees – the impact on Identity.
Setting up Non-Federated
Step 1 - Requesting your OneAdvanced Identity Service
Step 2 - Configuring your OneAdvanced Identity Organisation
Step 3 - Identity onboarding in Time and Attendance
Step 4 - Perform the Identity onboarding process
Step 5 - Inform employees and managers they can login using Identity
Step 6 - Employees and managers successfully login to Time and Attendance through Identity.
Setting up Federated
Federated Login with Time & Attendance - where Identity is already enabled for non-federated login
Step 1 - Requesting your OneAdvanced Identity Service (Federated)
Step 2 - Configuring your OneAdvanced Identity Organisation (Federated)
Step 2a - Setting up Federated using Entra, Google Identity or similar
Step 3 - Identity onboarding in Time and Attendance (Federated)
Step 4 - Perform the Identity onboarding process (Federated)
Step 5 - Inform employees and managers they can login using Identity (Federated)
Step 6 - Employees and managers successfully login to Time and Attendance through Identity (Federated)
SFTP Configuration
SFTP - Overview
SFTP - Prerequisites
SFTP - Generate your RSA 4096-bit SSH Key
SFTP - Connect with FileZilla
SFTP - Connect with WinSCP
SFTP - Upload and Download Files
SFTP - Troubleshooting
Onsite Report – OneAdvanced’s Liability Statement
RD Web User Guide: Duo Authentication Process Guide
Supervisor
The Supervisor View
Employee <undefined>
The Supervisor dashboard
Supervisor toolbar
Selecting Employees
Selection options
Employee and Group functions as a Supervisor
Change Supervisor password
Supervisor Functions
Clocking In and Out
Clocking in and out as a Supervisor
Clocking TAS
Location mapping for Clockings
SMS Clocking with Esendex
Make a T&A clocking
Absences
Employee Security
Invalid Credentials
Locking and unlocking an employee's account
Changing an Employee's PIN
Self service password reset
Password Expiry for Employees
Employee passwords
Timesheets
Payslip Management
Calendars
Restart Employee
Employee Maintenance
Availability
Supervisor Group Functions
On-site List
On-site list profile maintenance
Maintain On-site list
On-site list (Supervisor)
Maintain current watches
Modify On-site list
On-site system preferences
On-site list options
Diary
Group Planner
Rosters
Copy periods action
Create named roster action
Group planner preferences
Shift actions
Shift Lock To
Create personal rosters action
Group planner
Group Clock Card
Group Skills
Letters
Group Absence Profile
Find Cover
Job Planner
Group Messages
Hours Approval
Mass Change
Anomalies
Editing work records to correct Anomalies
Authorising in the Anomalies page
Review Anomalies as Supervisor
Group Badge List
Requests List
Adding Additional Payments
Budgeting
Reports
Reports overview
Supervisor Access to Reports
Default Reports
Report profiles
Creating a New Report
Adding additional columns to a Report
Report tasks
Reports employee selection
Bradford factor report
Running a Report
WinTMS User Guide
Employee
The Employee Dashboard
Employee Functions
Requests
Visitor Booking
On-site List
Employee Planner
Calendars
Clock Card
Clock card
Work record
Clockings Panel
Premium bands panel
Hours bands panel
Additional payments panel
Worked hours panel
Check Anomalies as Employee
Clocking T&A
Actual Lateness
Recent clockings
Employee Details
Timesheets
Reports
Payslips
Group Absence Profile
Availability
Availability
Availability details
Add Availability
Copy Availability
Delete availability
Availability errors
Absences
Employee Documents
Planned Shifts
Employee Messages
Skills
Employee Security
Auto-Rostering - Employees
Release Notes
Upgrading Time and Attendance
Release Reports
T&A 8.51.2.0 Release - 16th September 2026
T&A 8.51.1.0 Release - 4th August 2026
T&A 8.51.0.1 Release - 29th June 2026
T&A 8.51.0.0 Release - 26th May 2026
T&A 8.50.0.1 Patch Release - 11th May 2026
T&A 8.50.0.0 General Release - 21st April 2026
T&A 8.49.0.0 General Release - 20th March 2026
T&A 8.48.0.0 General Release - 27th February 2026
8.48 upgrade for P60 and Payroll End End - what you need to know
T&A 8.47.0.1 Patch Release - 20th February 2026
T&A 8.47.0.0 General Release - 9th January 2026
OneAdvanced mobile app
T&A 8.46.2.0 General Release - 27th November 2025
T&A 8.46.1.0 General Release - 30th October 2025
T&A 8.46.0.0 General Release - 15th October 2025
T&A 8.45.0.1 General Release - 21st August 2025
T&A 8.45 General Release - 9th July 2025
OneAdvanced People mobile app 1.3 release - 4th June 2025
T&A 8.44.0.0 General Release - 29th May 2025
OneAdvanced People mobile app launch - 20th March 2025
T&A 8.43.0.0 Controlled Release - 12th March 2025
T&A 8.42.0.0 General Release - 5th February 2025
T&A 8.41.2.0 General Release - 13th December 2024
T&A 8.41.1.0 General Release - 4th December 2024
T&A 8.41.0.0 General Release - 6th November 2024
T&A 8.39.0.1 Controlled Release - 17th July 2024
T&A 8.38.5.2 Controlled Release - 1st May 2024
T&A 8.39.0.0 Controlled Release - 19th June 2024
T&A 8.38.5.1 General Release - 16th February 2024
T&A 8.38.5.0 Controlled Release - 29th November 2023
T&A 8.38.4.1 Controlled Release - 2nd November 2023
T&A 8.38.4.0 Controlled Release - 1st September 2023
T&A 8.38.3.0 Controlled Release - 27th July 2023
T&A 8.38.2.0 Controlled Release - 9th June 2023
T&A 8.38.1.0 Controlled Release - 2nd May 2023
T&A 8.38.0.0 Controlled Release - 20th March 2023
T&A 8.37.4.2 General Release - 17th February 2023
T&A 8.37.4.0 Controlled Release - 20th January 2023
T&A 8.37.3.0 Controlled Release - 2nd December 2022
T&A 8.37.2.0 Controlled Release - 21st October 2022
T&A 8.37.1.0 Controlled Release - 1st September 2022
T&A 8.37.0.0 Controlled Release - 22nd July 2022
T&A 8.37.0.1 General Release - 23rd August 2022
T&A 8.36.10 Controlled Release - 9th June 2022
T&A 8.36.9.0 Controlled Release - 28th April 2022
T&A 8.36.8.1 General Release - 28th March 2022
T&A 8.36.7.1 General Release - 17th February 2022
T&A 8.36.7.0 General Release - 3rd February 2022
T&A 8.36.6.0 General Release - 16th December 2021
Got an idea?
OneAdvanced Mobile App
- All categories
-
- Adding New Customers
Adding New Customers

This guide covers how to create a new customer inside the OneAdvanced Platform. The only pre-requisite is that you are an Account Admin which will allow you to access the Platform System Admin org to complete this setup.
Raise a service now request to be made account admin.
Logging in to Platform System Admin
1) Navigate here https://apps.oneadvanced.com/
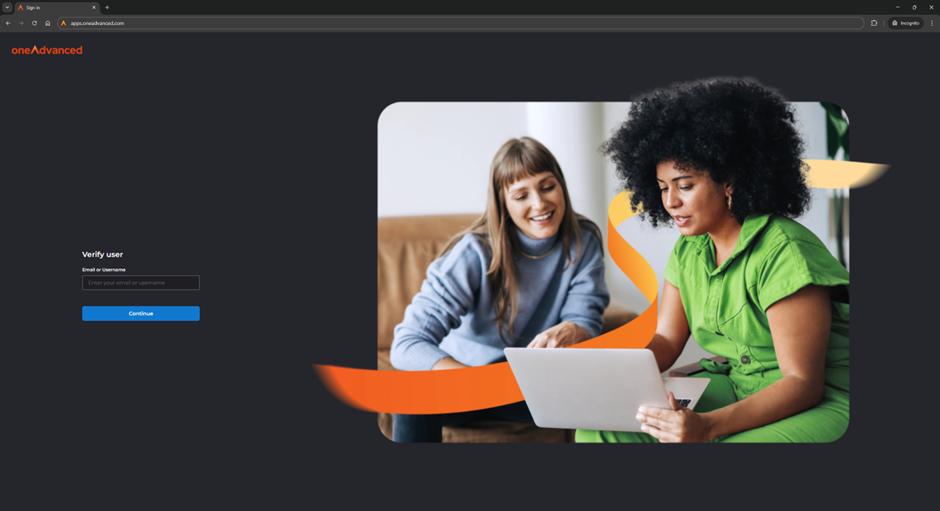
2) Enter your @oneadvanced.com email address. If it automatically logs you in you need to use incognito mode. Check you are not signed into the OneAdvanced Normal organisation that is used for P&T, HR etc. We would recommend incognito mode.
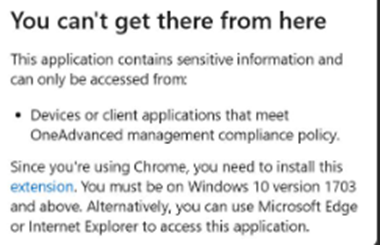
If you receive this error message you need to enable the Microsoft Single Sign On Chrome extension to run in Incognito mode. See the appendix.
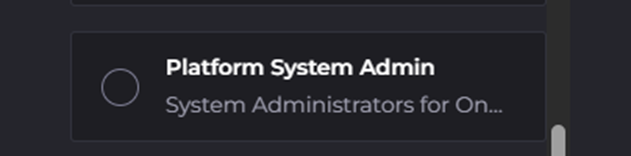
3) Select “Platform System Admin” from the list and press Continue. If you do not see this listed or you are always automatically logged in without seeing an option your account is not set up as an “Account Admin”. Please contact the identity team.
4) Complete the Azure single sign on MFA
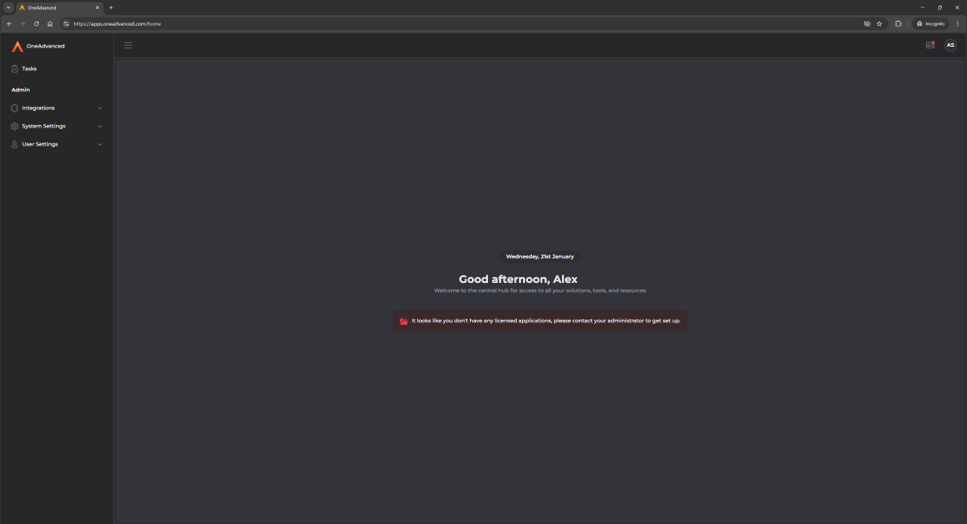
5) You should arrive here. The homepage with System Settings and User Settings on the left hand menu bar.
Adding a new customer
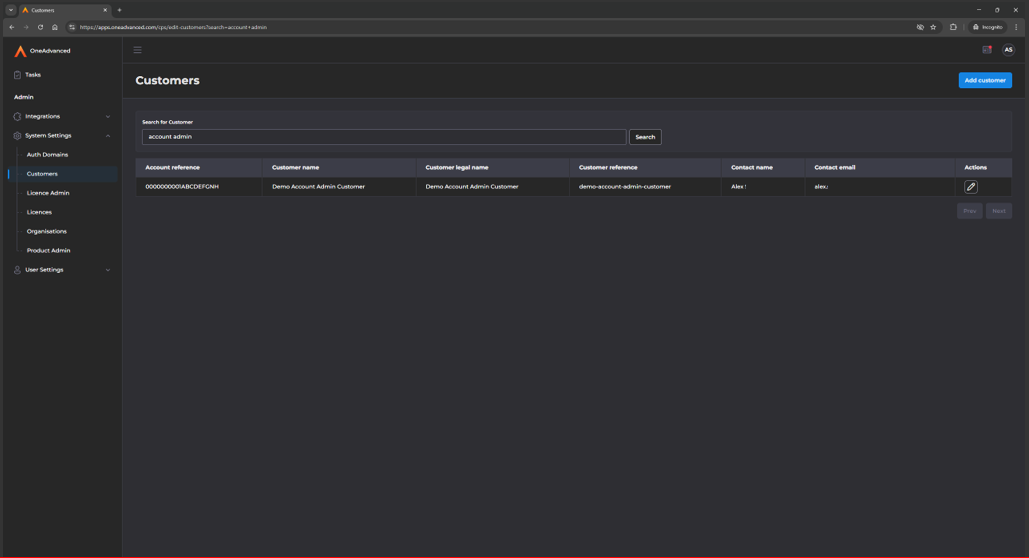
1) Open System Settings / Customers
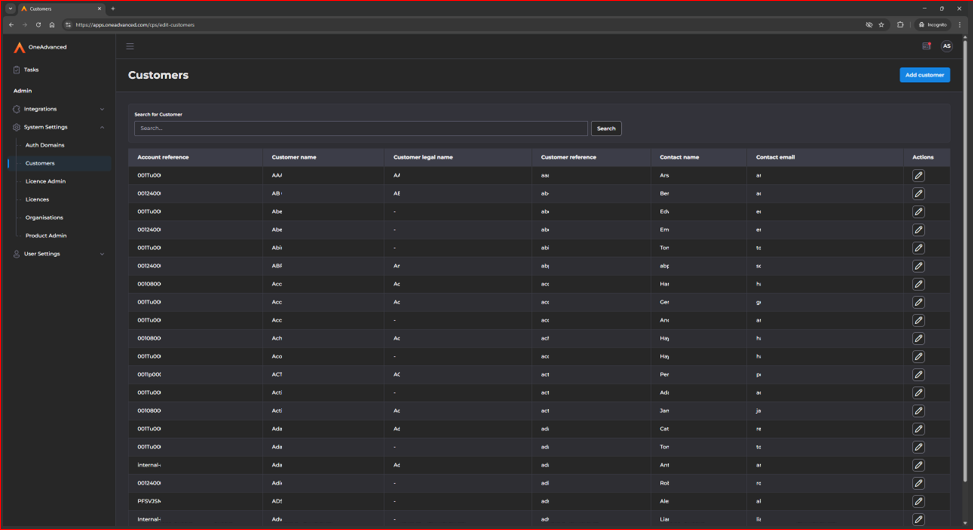
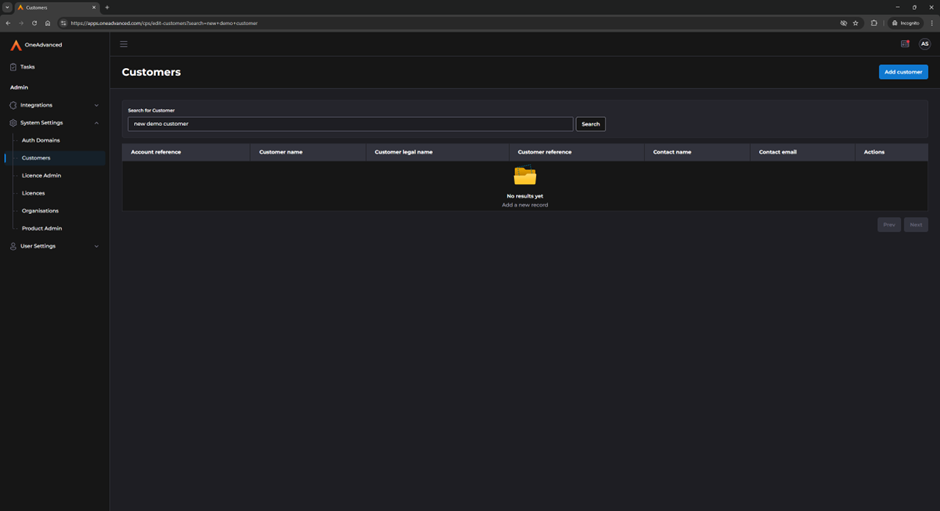
2) Perform a search for the customer using their name and then again using their salesforce account ID to ensure they do not already exist. We must not make duplicate customers.
3) Select Add customer and complete the form. Some apps such as T&A have a limited customer ref/ org reg length so ensure that it is not too long. This is automatically populated based on the name but you can edit it to make it shorter if you wish / require. Once the form is complete press Add customer to begin the creation process.
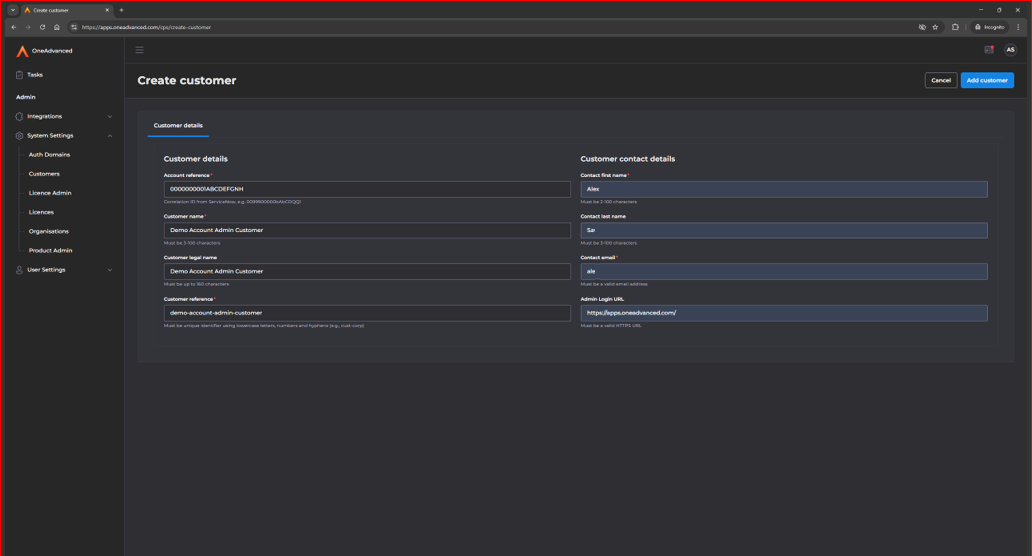
The Admin Login ID needs to be set to https://apps.oneadvanced.com/
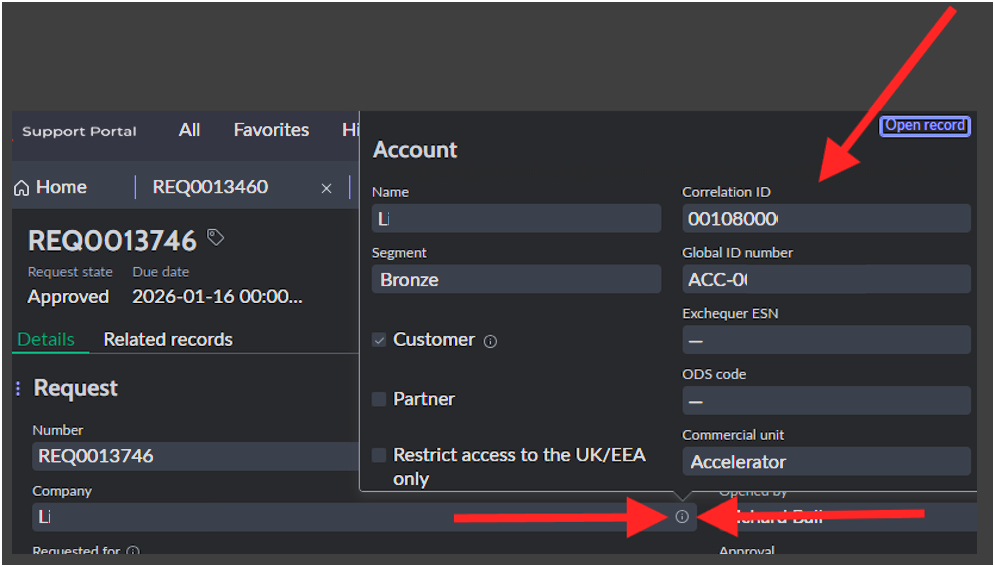
The Account reference needs to match service now provisioning request (which is also the salesforce account Id)
4) Wait for 2 to 5 minutes and perform a search for the new customer. Note at time of writing this guide there is no automatic notification to you as the Account Admin that the creation was successful. Keep retrying the search till it is completed. If this goes longer than 10 minutes, contact Platform for assistance.
The customer has now been created
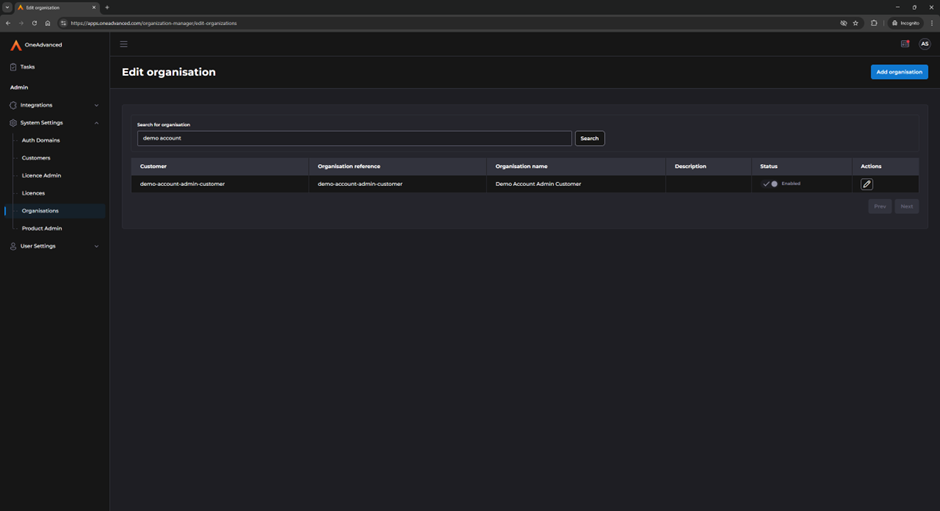
Enabling MFA for the customer
1) From System Settings / Organisations, search for the customer name and select the pencil icon
2) Set the “Requires MFA” toggle to on and accept the warning.
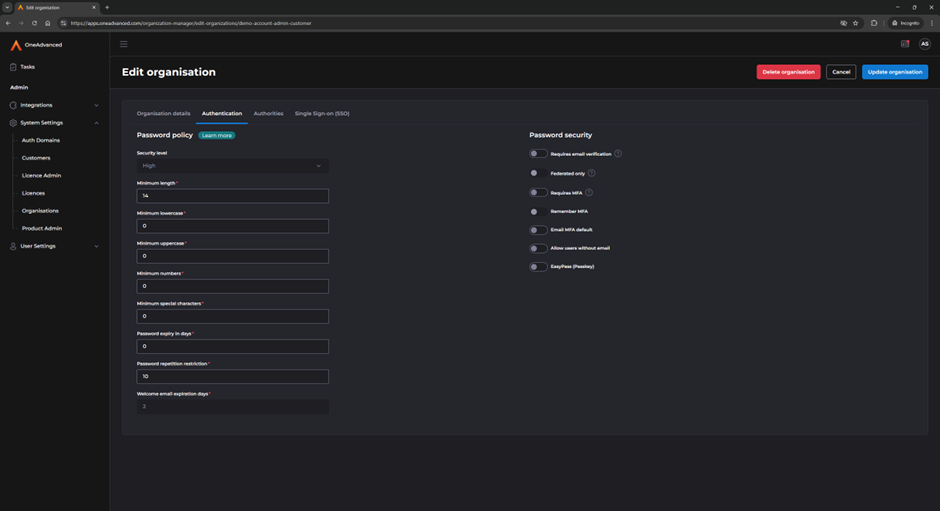
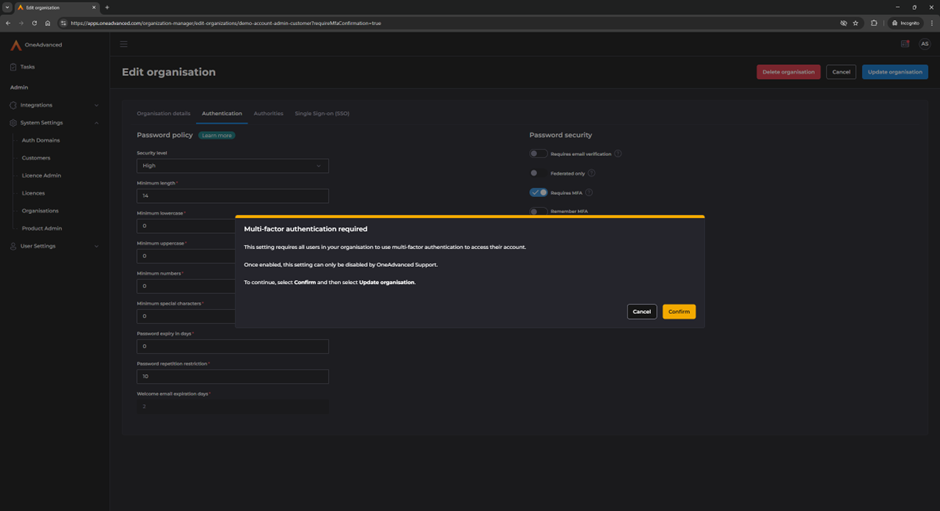
Then press the update Organisation button to save this change.
Sending the welcome email
When the customer was created we entered the details of the customer admin. This is the most powerful user who can make changes to the customer and organisation. In order for them to log in the first time and set their password we send them a welcome email to complete the enrolment.
1) Select User Settings / Users
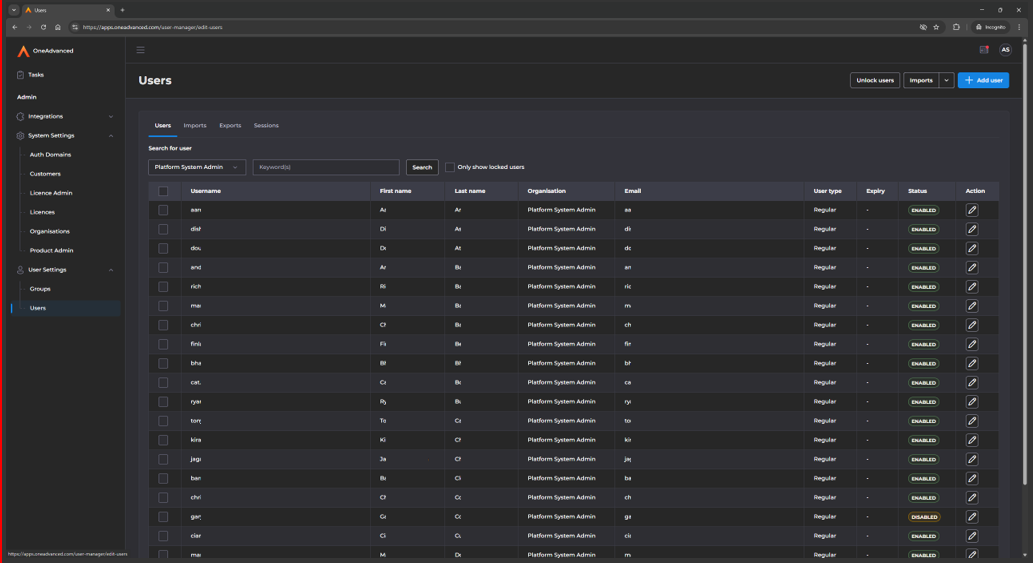
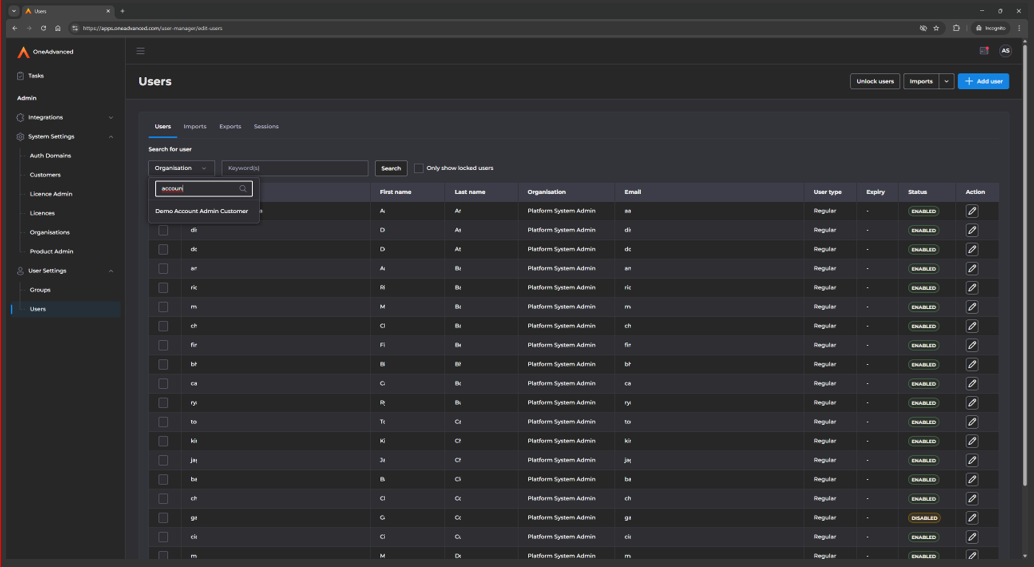
2) Select the Organisation drop down and enter the name of the customer to filter the results and select the customers name in the drop down.
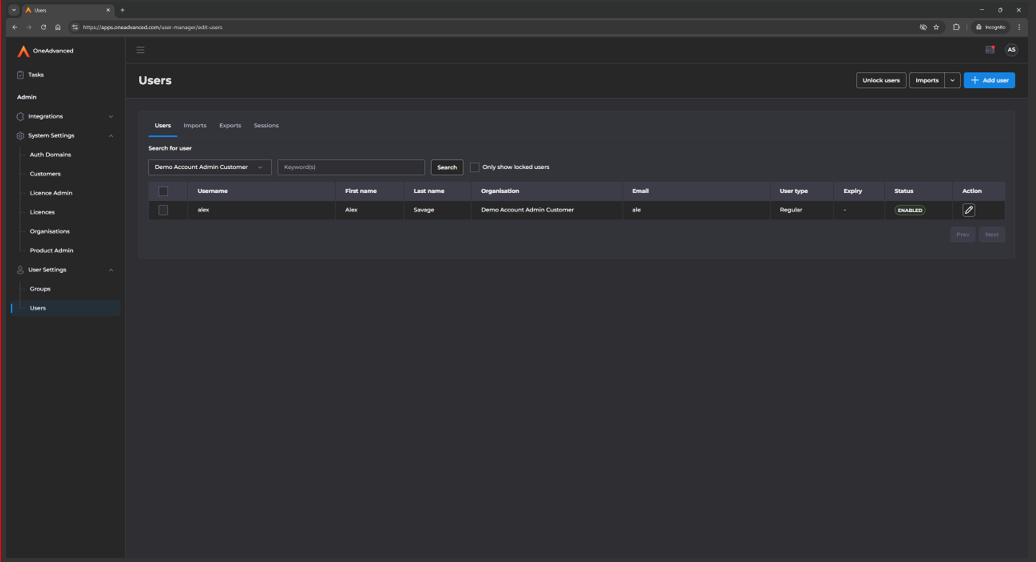
3) Click the pencil / edit button on the user. There will be only 1 for a new customer.
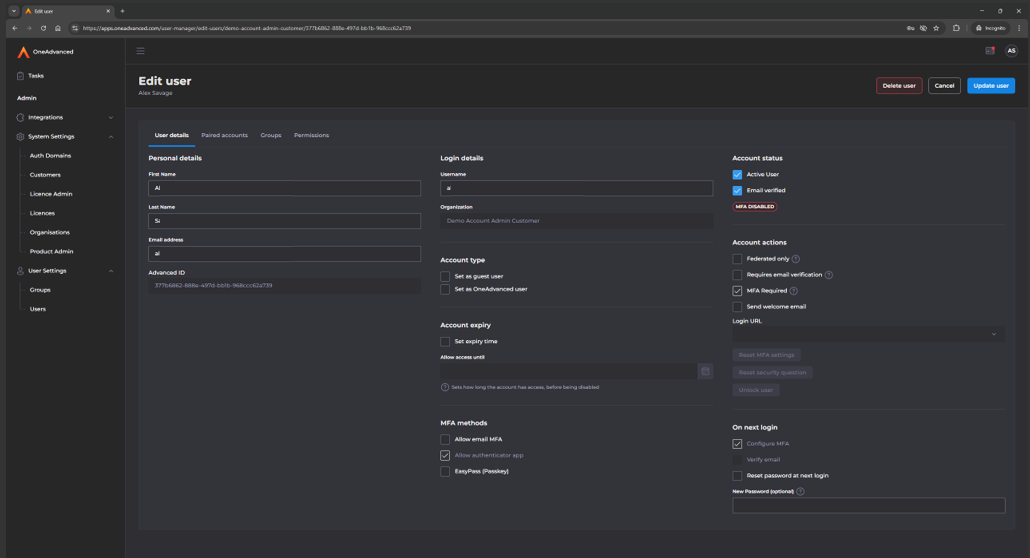
4) Toggle the “Send welcome email” button and select apps.oneadvanced.com for the login URL
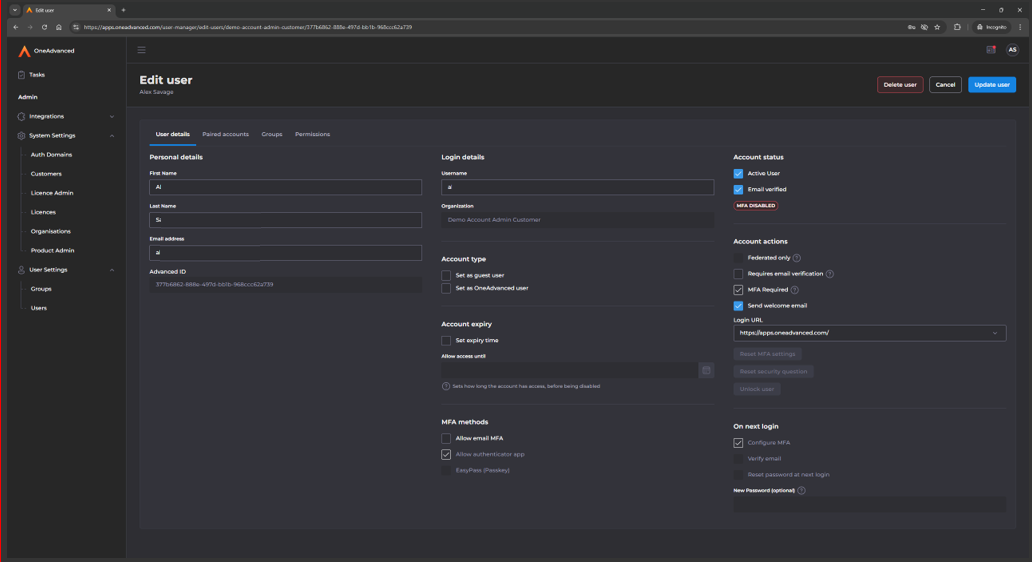
5) Press Update user.
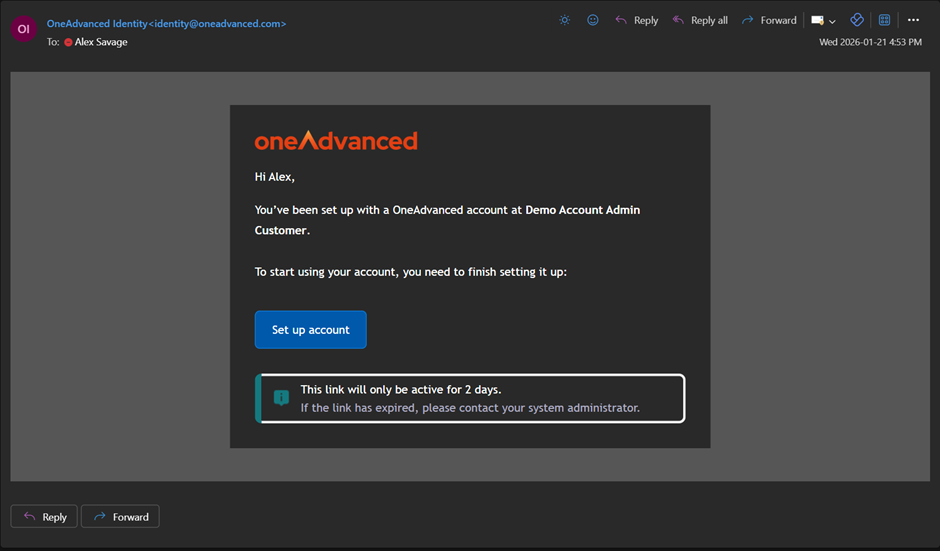
The user will now receive a welcome email inviting them to complete their onboarding including enrolling with MFA. This link is only valid for 2 days so ensure the recipient is ready / expecting this. If they fail to action it you can go back to this page and toggle send welcome email again and save it to send a fresh one. This only works if they have never completed the process and set a password.
Example email that the customer admin will receive
API Client creation
Once the customer organisation has been created, the API client needs to be created.
Please click here to access the Helps Docs guide on API client and follow the steps. This will create the Client ID and Client Secret that is required within the Time & Attendance Identity configuration screen.
Appendix
How to enable Microsoft Single Sign on in Incognito mode in Chrome.
If you get this error message when trying to log in
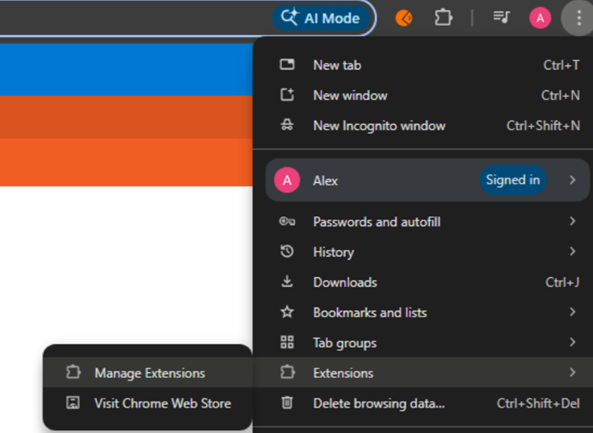
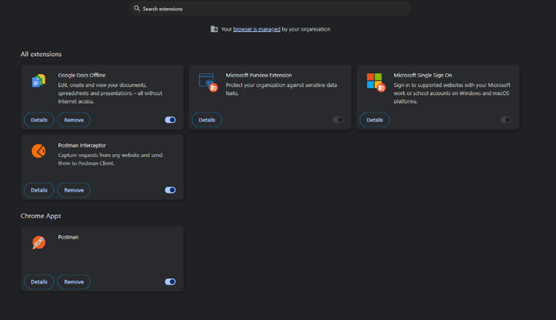
From the menu button in chrome select Extensions / Manage Extensions
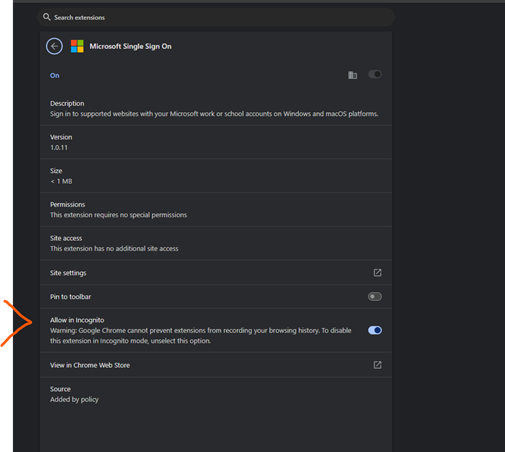
Then select “Details” from the Microsoft Single Sign On extension
Finally toggle the “Allow in Incognito” to on