System administrator
System Maintenance
Scheduled Messages
Modify message
Create message
Scheduled messages
Message frequency options
Report selection
Email settings and troubleshooting
Send one-time message
T&A Web
UK & IRE time change instructions
T&A instructions for UK & IRE Time Change - March 2025
FES Instructions for UK & IRE Summer Time Change – March 2025
Dashboard Maintenance
Profile maintenance
Tab maintenance
Dashboard maintenance
Reports widget
Widget maintenance
Widget public URLs
Themes and Dashboard
Modifying and deleting a created Theme
Dashboard background
Creating a Theme
Custom login logos
Active Themes
Progress Indicator
Theme
Calendar Maintenance
Create calendar
Calendar profiles
Calendar data types page
Calendar maintenance
Creating a Calendar data type
Payslip Management
Kiosk
Kiosk details
Kiosk Configuration
Modify action
Kiosk site planner
Kiosk log
Modify Kiosk preferences
Preparing to install Kiosk
Terminal Site Planner
Deactivate and Reactivate the terminal webpage
Upgrade Terminal Firmware on 900 series or Access Control Unit via Web Service
Terminal upgrades
Terminal Site Planner
Poller preferences
Terminal Actions
Job Scheduler
Poller log
SAML Authentication
Licensing
Licensing upload errors
Upload T&A 8 License Instructions
Temporary Licence
Version Number Mismatch
Licensing
Request a Licence
Upload a Licence
Employee License
Messages Received
Enroller
Language Maintenance
Profile language
Importing and Exporting phrases
T&A Error phrases
Language maintenance
Culture maintenance
Advanced T&A Products Minimum IT Specifications
Configuring T&A for use with Microsoft Exchange Online
Support Knowledge Base
Clearing Anomalies - Start a New Period End
T&A 8 licence expiry and renewal
Adding and changing Users in WINTMS
Full Rights for New User
AutoID Badge designer
Delete a Finger Template
Need to Create a Report With a Date Prompt
T&A - European Working Time Directive Features
How to Change the Name Displayed on the Terminal
Client Install instructions
How to Download an Employee to the Terminals
Create New User
Changing the IP Address on a Mitrefinch 900 Series clock or Access control unit.
Employee in TMS but not in HR Manager
GPS clocking location from a mobile phone
Report That Shows if the Employee Has a Photo
Obtaining "500 internal server error" details
Spring Time Change - North America
How to Unlock a User
Support is Evolving
Data Assurance Module - Identifying and preventing the accidental deletion of data (TMS versions 8.33.0.0 and below)
.NET Framework 4.8 for T&A (version 8.35.0+)
'Use Only Once' Checkbox on Book Absence Screen
Changing the OT Threshold for OT Hours Calculation
Poller Keeps Going Down
Help with Australian ADP Export Coding
The Basics
Change Culture
Supervisor Basic Operations
Apply assumed clocks
Changes to hierarchical Security
Adding an additional day of credit
Invalid Login
T&A Entitlement Year End Procedure - Hosted by OneAdvanced
T&A Entitlement Year End Procedure - On premise
Logging in and out as an Employee
Apache Log4j CVE-2021-44228 "Log4Shell" vulnerability
Employee basic operations
TMS Apps
Logging in: the Help button
Adding a keyed absence
Logging in as a Supervisor
Error tGlb.GetPkg
General navigation
COVID 19 - How to manage staff working from home
SAML Authentication in TMS 7
Auto-Rostering - User Admin/Supervisors
Auto-Rostering overview
What data is synced from Time & Attendance to Auto-Rostering?
Schedule Setup
Manage Schedules
Solving a Schedule
Schedule Approval
Employee and User Management
Reporting
Employee Confirmations
Dashboards
Frequently asked questions - Auto-Rostering
T&A Data Share
Identity by OneAdvanced
Understanding Identity with T&A
Introduction to Identity
Identity by OneAdvanced - Platform guidance
Identity FAQs
Choose your authentication method (Federated vs Non-federated)
Managing multiple access needs
Employees without email addresses
What do I need to know?
Managing Identity
Leavers, rejoiners and deleting employees – the impact on Identity.
Setting up Non-Federated
Step 1 - Requesting your OneAdvanced Identity Service
Step 2 - Configuring your OneAdvanced Identity Organisation
Step 3 - Identity onboarding in Time and Attendance
Step 4 - Perform the Identity onboarding process
Step 5 - Inform employees and managers they can login using Identity
Step 6 - Employees and managers successfully login to Time and Attendance through Identity.
Setting up Federated
Step 1 - Requesting your OneAdvanced Identity Service (Federated)
Step 2 - Configuring your OneAdvanced Identity Organisation (Federated)
Step 3 - Identity onboarding in Time and Attendance (Federated)
Step 4 - Perform the Identity onboarding process (Federated)
Step 5 - Inform employees and managers they can login using Identity (Federated)
Step 6 - Employees and managers successfully login to Time and Attendance through Identity (Federated)
Onsite Report – OneAdvanced’s Liability Statement
RD Web User Guide: Duo Authentication Process Guide
Supervisor
The Supervisor View
Employee <undefined>
The Supervisor dashboard
Supervisor toolbar
Selecting Employees
Selection options
Employee and Group functions as a Supervisor
Change Supervisor password
Supervisor Functions
Clocking In and Out
Clocking in and out as a Supervisor
Clocking TAS
Location mapping for Clockings
SMS Clocking with Esendex
Make a T&A clocking
Absences
Employee Security
Invalid Credentials
Locking and unlocking an employee's account
Changing an Employee's PIN
Self service password reset
Password Expiry for Employees
Employee passwords
Timesheets
Payslip Management
Calendars
Restart Employee
Employee Maintenance
Availability
Supervisor Group Functions
On-site List
On-site list profile maintenance
Maintain On-site list
On-site list (Supervisor)
Maintain current watches
Modify On-site list
On-site system preferences
On-site list options
Diary
Group Planner
Rosters
Copy periods action
Create named roster action
Group planner preferences
Shift actions
Shift Lock To
Create personal rosters action
Group planner
Group Clock Card
Group Skills
Letters
Group Absence Profile
Find Cover
Job Planner
Group Messages
Hours Approval
Mass Change
Anomalies
Editing work records to correct Anomalies
Authorising in the Anomalies page
Review Anomalies as Supervisor
Group Badge List
Requests List
Adding Additional Payments
Budgeting
Reports
Reports overview
Supervisor Access to Reports
Default Reports
Report profiles
Creating a New Report
Adding additional columns to a Report
Report tasks
Reports employee selection
Bradford factor report
Running a Report
WinTMS User Guide
Employee
The Employee Dashboard
Employee Functions
Requests
Visitor Booking
On-site List
Employee Planner
Calendars
Clock Card
Clock card
Work record
Clockings Panel
Premium bands panel
Hours bands panel
Additional payments panel
Worked hours panel
Check Anomalies as Employee
Clocking T&A
Actual Lateness
Recent clockings
Employee Details
Timesheets
Reports
Payslips
Group Absence Profile
Availability
Availability
Availability details
Add Availability
Copy Availability
Delete availability
Availability errors
Absences
Employee Documents
Planned Shifts
Employee Messages
Skills
Employee Security
Auto-Rostering - Employees
Release Notes
Upgrading Time and Attendance
Release Reports
T&A 8.51.0.1 Release - 29th June 2026
T&A 8.51.0.0 Release - 26th May 2026
T&A 8.50.0.1 Patch Release - 11th May 2026
T&A 8.50.0.0 General Release - 21st April 2026
T&A 8.49.0.0 General Release - 20th March 2026
T&A 8.48.0.0 General Release - 27th February 2026
8.48 upgrade for P60 and Payroll End End - what you need to know
T&A 8.47.0.1 Patch Release - 20th February 2026
T&A 8.47.0.0 General Release - 9th January 2026
OneAdvanced mobile app
T&A 8.46.2.0 General Release - 27th November 2025
T&A 8.46.1.0 General Release - 30th October 2025
T&A 8.46.0.0 General Release - 15th October 2025
T&A 8.45.0.1 General Release - 21st August 2025
T&A 8.45 General Release - 9th July 2025
OneAdvanced People mobile app 1.3 release - 4th June 2025
T&A 8.44.0.0 General Release - 29th May 2025
OneAdvanced People mobile app launch - 20th March 2025
T&A 8.43.0.0 Controlled Release - 12th March 2025
T&A 8.42.0.0 General Release - 5th February 2025
T&A 8.41.2.0 General Release - 13th December 2024
T&A 8.41.1.0 General Release - 4th December 2024
T&A 8.41.0.0 General Release - 6th November 2024
T&A 8.39.0.1 Controlled Release - 17th July 2024
T&A 8.38.5.2 Controlled Release - 1st May 2024
T&A 8.39.0.0 Controlled Release - 19th June 2024
T&A 8.38.5.1 General Release - 16th February 2024
T&A 8.38.5.0 Controlled Release - 29th November 2023
T&A 8.38.4.1 Controlled Release - 2nd November 2023
T&A 8.38.4.0 Controlled Release - 1st September 2023
T&A 8.38.3.0 Controlled Release - 27th July 2023
T&A 8.38.2.0 Controlled Release - 9th June 2023
T&A 8.38.1.0 Controlled Release - 2nd May 2023
T&A 8.38.0.0 Controlled Release - 20th March 2023
T&A 8.37.4.2 General Release - 17th February 2023
T&A 8.37.4.0 Controlled Release - 20th January 2023
T&A 8.37.3.0 Controlled Release - 2nd December 2022
T&A 8.37.2.0 Controlled Release - 21st October 2022
T&A 8.37.1.0 Controlled Release - 1st September 2022
T&A 8.37.0.0 Controlled Release - 22nd July 2022
T&A 8.37.0.1 General Release - 23rd August 2022
T&A 8.36.10 Controlled Release - 9th June 2022
T&A 8.36.9.0 Controlled Release - 28th April 2022
T&A 8.36.8.1 General Release - 28th March 2022
T&A 8.36.7.1 General Release - 17th February 2022
T&A 8.36.7.0 General Release - 3rd February 2022
T&A 8.36.6.0 General Release - 16th December 2021
Got an idea?
OneAdvanced Mobile App
Contents
- All categories
- Release Notes
- Release Reports
- T&A 8.45 General Release - 9th July 2025
T&A 8.45 General Release - 9th July 2025

Auto-Rostering in Time & Attendance and Defect fixes for v8.45.0.0
Overview
We're excited to announce the launch of the OneAdvanced Auto-Rostering within the latest general release of Time & Attendance: Version 8.45, released 9th July 2025
By upgrading to v8.45, you'll benefit from resolved issues and improved performance, as well as being able to configure Auto-Rostering along side Time & Attendance.
Auto-Rostering features:
This powerful tool is designed to save time, reduce manual effort and create fair, compliant and efficient schedules, especially for complex environments like manufacturing, retail, care, leisure, and hospitality.
What is Auto-Rostering? Auto-Rostering is an intelligent scheduling system that automatically assigns shifts based on your business rules, workforce needs and employee preferences. Instead of manually building schedules, Auto-Rostering takes care of the heavy lifting—factoring in constraints like availability, skills and compliance rules while balancing fairness and efficiency.
Walkthrough of a Schedule When setting up a schedule, you’ll start by defining your constraints—things like minimum shift coverage, employee qualifications for specific jobs, maximum working hours, and adherence to legal regulations. You can also add preferences, such as employee preferred shifts or days off.
Constraints and Rankings Once the constraints are in place, you’ll set the ranking system. This lets you prioritise certain factors, such as ensuring key roles are always filled, or giving weight to seniority or employee preferences. For example, if an employee has specialised training required for a machine, they’ll rank higher for that shift compared to others.
Autosolve With everything set, you simply hit “Autosolve,” and the system generates an optimised schedule in seconds. It evaluates all the constraints and rankings to create a balanced, compliant roster that meets business needs while being fair to employees. You can review the schedule and make adjustments as needed, but the heavy lifting is done for you.
Job Offers Another key feature is Job Offers. If there are gaps in the schedule—say, due to last-minute changes or unfilled shifts—the system can send out job offers to qualified employees. This allows them to accept or decline shifts directly, giving you a quick and efficient way to fill vacancies without disrupting operations.
By combining automation, flexibility and fairness, Auto-Rostering ensures you always have the right people in the right place at the right time. It’s a game-changer for busy managers who want to spend less time on admin and more time focusing on strategic priorities.
Get started with Auto-Rostering
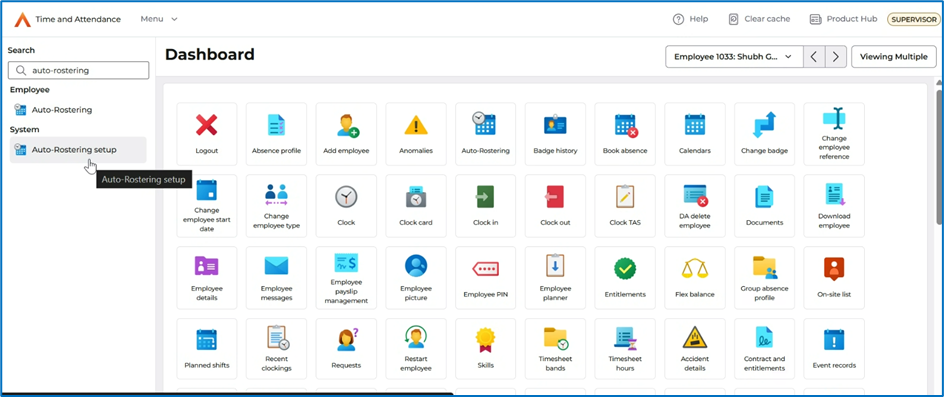
User Admin can access Auto-Rostering setup from within T&A. Navigate via the Menu option on the Dashboard and search for Auto-Rostering set up. To gain access to Auto-Rostering setup, the user needs to be setup as a User Administrator in OneAdvanced Identity.
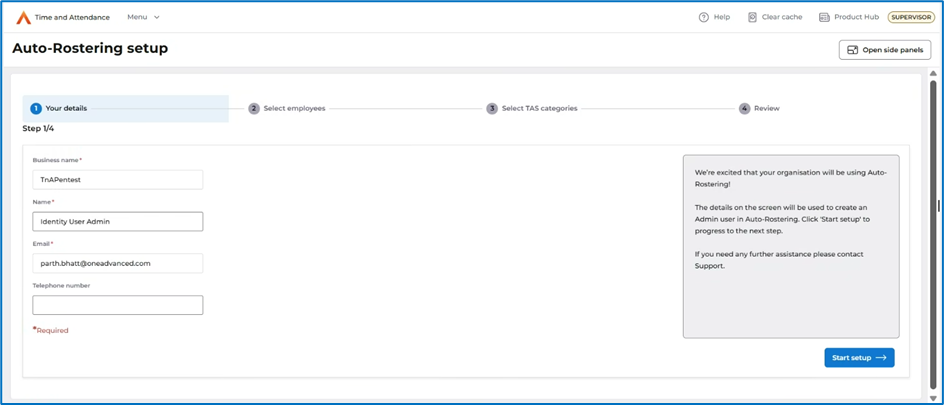
Step 1 - Your details:
This screen will automatically populate with the details of the Admin User logged in, the telephone number needs to be manually entered before proceeding with the setup.
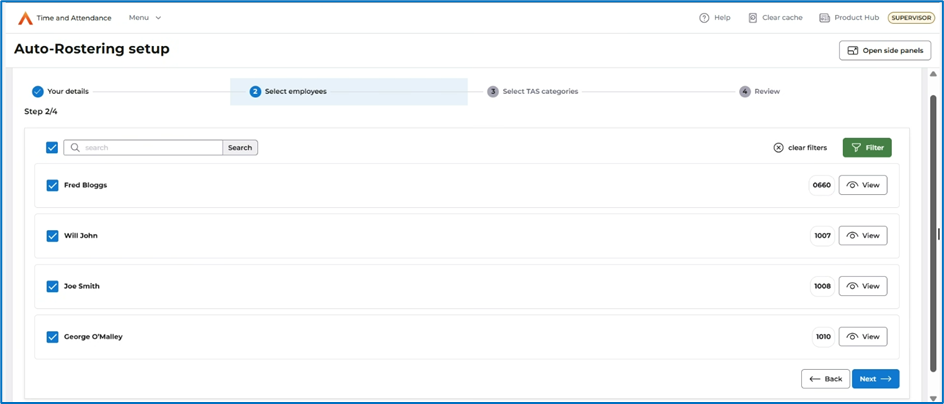
Step 2 - Select employees:
Employees that need to use Auto-Rostering can be added here. The user can use the Filter to find the employees they want to add. Additional employees can be added later if required.
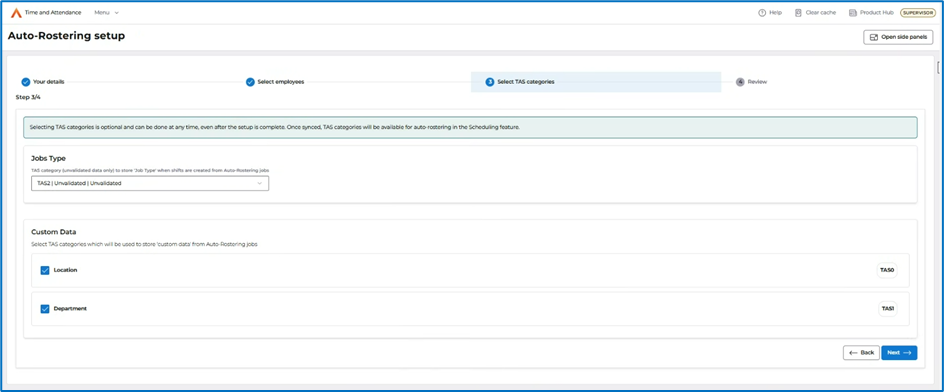
Step 3 - Select TAS categories:
Selecting TAS categories is optional and can be setup at any time.
Job Type: Select the Job Type
Custom data: Select which TAS categories will be used to store customer data from Auto-Rostering jobs. Only TAS categories with the following lookup names will be supported:
- Location
- Department
- Cost Code
- Division
- Job Title
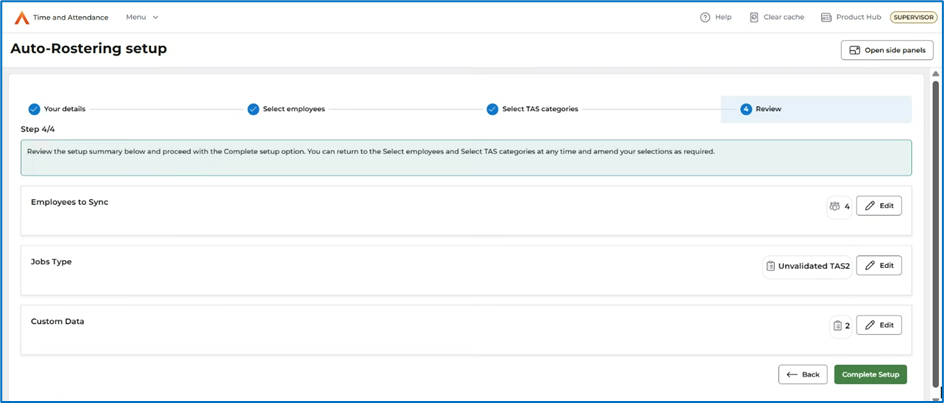
Step 4 - Review:
Amend employees or TAS selections by using the Edit options. Once you are happy with your setup select Complete Setup. This will trigger an email request to the Support team at OneAdvanced who will configure your environment and send an email back to the Admin user who submitted the request.
Once your system has been configured, the Admin user will be notified that Auto-Rostering is configured and available. The Admin user can now log into Auto-Rostering, this can be done directly via the link in the notification email or via Time & Attendance dashboard option.
Next Steps
The Admin user can now log into Auto-Rostering to setup other users and configure jobs and schedules.
Step 1 - Access System Preferences - Email configuration
The Admin user will need to configure the email SMTP server, this will allow emails to be sent from Auto-Rostering. To setup the Emails, access the System Preferences from within Auto-Rostering and open the Email tab. This email will be used to send an email notification to existing users and employees informing them that they have access to Auto-Rostering.
Step 2 - User Management
Admin users can manage and create users, and manage employee profiles from within the User Management section via Settings.
For help setting up Users follow this article here, the same article can be followed to send the new users access details.
Once employees and users are configured and you have chosen to provide them with access, an automated email will be sent to each user/employee providing them details of the Auto-Rostering link URL and a chance to setup their password when they log in.
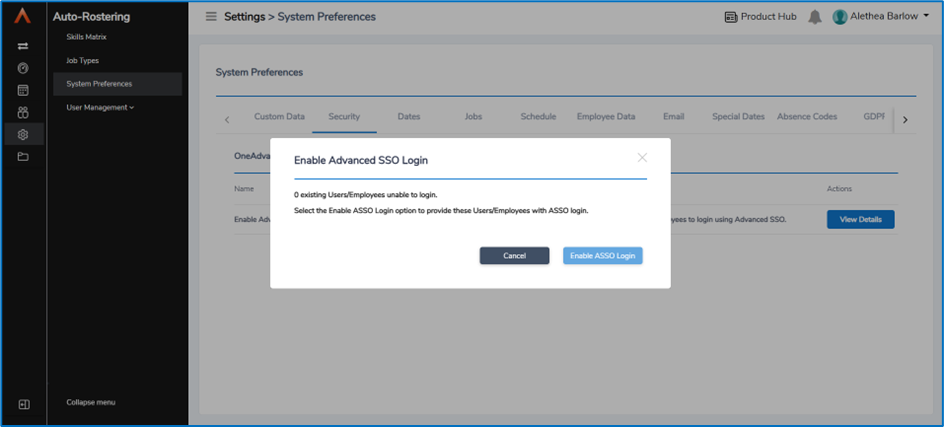
Step 3 - Access System Preferences - Security
Once users are set up and the chosen employees have been synchronised from Time & Attendance into Auto-Rostering, the Admin user will need to enable SSO login for users and employees of Auto-Rostering. This can be done from within System Preferences, access the Security tab, press View Details button. This will display the Enable Advanced SSO login window. Click on the Enable ASSO login button. This will enable Advanced SSO (ASSO) login for all the employees that were synchronised as part of the initial provisioning setup.
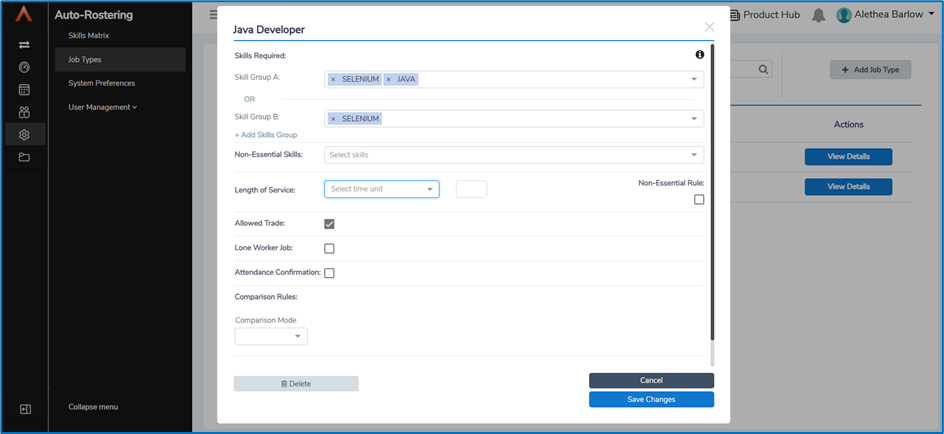
Step 4 - Job Types
You can now define your job types within Auto-Rostering. Access Job Types, then Add a new job, here you can define the attributes of the job such as Skills, length of service, lone worker, allow trade etc. required for that job. Read the article here for help setting up Jobs.
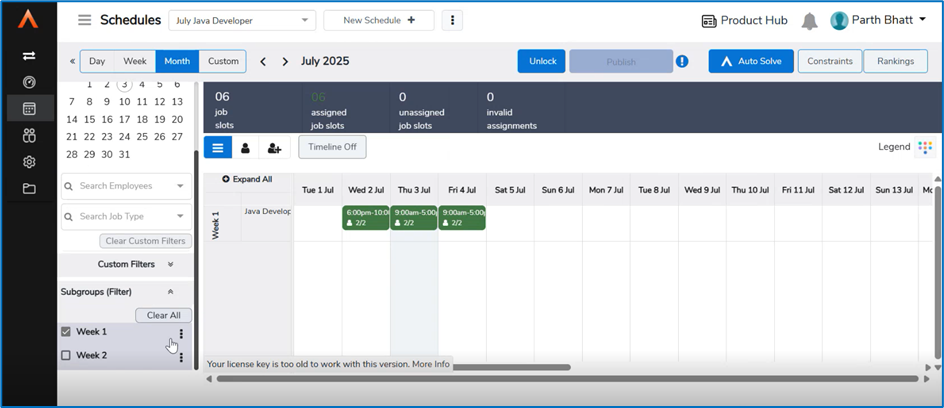
Step 5 - Create Schedule
You are now ready to create your schedule and within that a sub group which will define the length of the schedule eg 1 week, 2 weeks. Follow this article here for help creating/modifying Schedules as well as help creating Subgroups and assigning Jobs.
Further information on using Auto-Rostering can be found in our User Guides available here.
Alternatively if you have a question or issue configuring Auto-Rostering, take a look at our FAQ page available here.
Key updates in version 8.45
The following fixes are included in this release to improve your experience with Time & Attendance:
Reference | Issue | Resolution Notes |
TA-11892 | Negative absence hours are calculated when employees work more hours beyond the minimum shift and have a planned absence. | Absence hours are calculated, and if the value is negative (less than 0), absence hours are not displayed. |
TA-11920 | Add watch' option in the On-site list is non-functional and does not trigger any action. | Watch is added successfully and is now visible in the On-Site List screens. |
TA-12009 | Clocking fails with a 400 Bad Request error when using a language that contains accented characters. | Employee is now able to clock in and out successfully without encountering any errors. |
TA-12131 | Copying employees was causing issues with ASSO logins | The copy employees function was changed to not copy unique fields eg email address, thus enabling these fields to be updated for the new employee and not cause errors for duplicate records. |
TA-12135 | Versions older than 8.26 did not have a Content-Security-Policy, which caused upgrading issues. | The web-config has now been changed and the Content-Security-Policy added. |
How to gain access to the Auto-Rostering module.
To start using Auto-rostering, the following requirements must be met:
- Upgrade to Version 8.45: Ensure your system is running the latest version of Time & Attendance.
- Cloud hosting: Auto-Rostering is available to everyone on our cloud-based solution and have accepted our new Terms & Conditions.
- Identity: Your system must be set up with our Identity capability, providing secure access via single sign-on (SSO) and multi-factor authentication (MFA).
For detailed instructions on how to upgrade to Version 8.45, please refer to our Upgrade Guide. If you have any questions, our Customer Support team is ready to assist.