System administrator
System Maintenance
Scheduled Messages
Modify message
Create message
Scheduled messages
Message frequency options
Report selection
Email settings and troubleshooting
Send one-time message
T&A Web
UK & IRE time change instructions
T&A instructions for UK & IRE Time Change - March 2025
FES Instructions for UK & IRE Summer Time Change – March 2025
Dashboard Maintenance
Profile maintenance
Tab maintenance
Dashboard maintenance
Reports widget
Widget maintenance
Widget public URLs
Themes and Dashboard
Modifying and deleting a created Theme
Dashboard background
Creating a Theme
Custom login logos
Active Themes
Progress Indicator
Theme
Calendar Maintenance
Create calendar
Calendar profiles
Calendar data types page
Calendar maintenance
Creating a Calendar data type
Payslip Management
Kiosk
Kiosk details
Kiosk Configuration
Modify action
Kiosk site planner
Kiosk log
Modify Kiosk preferences
Preparing to install Kiosk
Terminal Site Planner
Deactivate and Reactivate the terminal webpage
Upgrade Terminal Firmware on 900 series or Access Control Unit via Web Service
Terminal upgrades
Terminal Site Planner
Poller preferences
Terminal Actions
Job Scheduler
Poller log
SAML Authentication
Licensing
Licensing upload errors
Upload T&A 8 License Instructions
Temporary Licence
Version Number Mismatch
Licensing
Request a Licence
Upload a Licence
Employee License
Messages Received
Enroller
Language Maintenance
Profile language
Importing and Exporting phrases
T&A Error phrases
Language maintenance
Culture maintenance
Advanced T&A Products Minimum IT Specifications
Configuring T&A for use with Microsoft Exchange Online
Support Knowledge Base
Clearing Anomalies - Start a New Period End
T&A 8 licence expiry and renewal
Adding and changing Users in WINTMS
Full Rights for New User
AutoID Badge designer
Delete a Finger Template
Need to Create a Report With a Date Prompt
T&A - European Working Time Directive Features
How to Change the Name Displayed on the Terminal
Client Install instructions
How to Download an Employee to the Terminals
Create New User
Changing the IP Address on a Mitrefinch 900 Series clock or Access control unit.
Employee in TMS but not in HR Manager
GPS clocking location from a mobile phone
Report That Shows if the Employee Has a Photo
Obtaining "500 internal server error" details
Spring Time Change - North America
How to Unlock a User
Support is Evolving
Data Assurance Module - Identifying and preventing the accidental deletion of data (TMS versions 8.33.0.0 and below)
.NET Framework 4.8 for T&A (version 8.35.0+)
'Use Only Once' Checkbox on Book Absence Screen
Changing the OT Threshold for OT Hours Calculation
Poller Keeps Going Down
Help with Australian ADP Export Coding
The Basics
Change Culture
Supervisor Basic Operations
Apply assumed clocks
Changes to hierarchical Security
Adding an additional day of credit
Invalid Login
T&A Entitlement Year End Procedure - Hosted by OneAdvanced
T&A Entitlement Year End Procedure - On premise
Logging in and out as an Employee
Apache Log4j CVE-2021-44228 "Log4Shell" vulnerability
Employee basic operations
TMS Apps
Logging in: the Help button
Adding a keyed absence
Logging in as a Supervisor
Error tGlb.GetPkg
General navigation
COVID 19 - How to manage staff working from home
SAML Authentication in TMS 7
Auto-Rostering - User Admin/Supervisors
Auto-Rostering overview
What data is synced from Time & Attendance to Auto-Rostering?
Schedule Setup
Manage Schedules
Solving a Schedule
Schedule Approval
Employee and User Management
Reporting
Employee Confirmations
Dashboards
Frequently asked questions - Auto-Rostering
T&A Data Share
Identity by OneAdvanced
Understanding Identity with T&A
Introduction to Identity
Identity by OneAdvanced - Platform guidance
Identity FAQs
Choose your authentication method (Federated vs Non-federated)
Managing multiple access needs
Employees without email addresses
What do I need to know?
Managing Identity
Leavers, rejoiners and deleting employees – the impact on Identity.
Setting up Non-Federated
Step 1 - Requesting your OneAdvanced Identity Service
Step 2 - Configuring your OneAdvanced Identity Organisation
Step 3 - Identity onboarding in Time and Attendance
Step 4 - Perform the Identity onboarding process
Step 5 - Inform employees and managers they can login using Identity
Step 6 - Employees and managers successfully login to Time and Attendance through Identity.
Setting up Federated
Step 1 - Requesting your OneAdvanced Identity Service (Federated)
Step 2 - Configuring your OneAdvanced Identity Organisation (Federated)
Step 3 - Identity onboarding in Time and Attendance (Federated)
Step 4 - Perform the Identity onboarding process (Federated)
Step 5 - Inform employees and managers they can login using Identity (Federated)
Step 6 - Employees and managers successfully login to Time and Attendance through Identity (Federated)
Onsite Report – OneAdvanced’s Liability Statement
RD Web User Guide: Duo Authentication Process Guide
Supervisor
The Supervisor View
Employee <undefined>
The Supervisor dashboard
Supervisor toolbar
Selecting Employees
Selection options
Employee and Group functions as a Supervisor
Change Supervisor password
Supervisor Functions
Clocking In and Out
Clocking in and out as a Supervisor
Clocking TAS
Location mapping for Clockings
SMS Clocking with Esendex
Make a T&A clocking
Absences
Employee Security
Invalid Credentials
Locking and unlocking an employee's account
Changing an Employee's PIN
Self service password reset
Password Expiry for Employees
Employee passwords
Timesheets
Payslip Management
Calendars
Restart Employee
Employee Maintenance
Availability
Supervisor Group Functions
On-site List
On-site list profile maintenance
Maintain On-site list
On-site list (Supervisor)
Maintain current watches
Modify On-site list
On-site system preferences
On-site list options
Diary
Group Planner
Rosters
Copy periods action
Create named roster action
Group planner preferences
Shift actions
Shift Lock To
Create personal rosters action
Group planner
Group Clock Card
Group Skills
Letters
Group Absence Profile
Find Cover
Job Planner
Group Messages
Hours Approval
Mass Change
Anomalies
Editing work records to correct Anomalies
Authorising in the Anomalies page
Review Anomalies as Supervisor
Group Badge List
Requests List
Adding Additional Payments
Budgeting
Reports
Reports overview
Supervisor Access to Reports
Default Reports
Report profiles
Creating a New Report
Adding additional columns to a Report
Report tasks
Reports employee selection
Bradford factor report
Running a Report
WinTMS User Guide
Employee
The Employee Dashboard
Employee Functions
Requests
Visitor Booking
On-site List
Employee Planner
Calendars
Clock Card
Clock card
Work record
Clockings Panel
Premium bands panel
Hours bands panel
Additional payments panel
Worked hours panel
Check Anomalies as Employee
Clocking T&A
Actual Lateness
Recent clockings
Employee Details
Timesheets
Reports
Payslips
Group Absence Profile
Availability
Availability
Availability details
Add Availability
Copy Availability
Delete availability
Availability errors
Absences
Employee Documents
Planned Shifts
Employee Messages
Skills
Employee Security
Auto-Rostering - Employees
Release Notes
Upgrading Time and Attendance
Release Reports
T&A 8.51.0.1 Release - 29th June 2026
T&A 8.51.0.0 Release - 26th May 2026
T&A 8.50.0.1 Patch Release - 11th May 2026
T&A 8.50.0.0 General Release - 21st April 2026
T&A 8.49.0.0 General Release - 20th March 2026
T&A 8.48.0.0 General Release - 27th February 2026
8.48 upgrade for P60 and Payroll End End - what you need to know
T&A 8.47.0.1 Patch Release - 20th February 2026
T&A 8.47.0.0 General Release - 9th January 2026
OneAdvanced mobile app
T&A 8.46.2.0 General Release - 27th November 2025
T&A 8.46.1.0 General Release - 30th October 2025
T&A 8.46.0.0 General Release - 15th October 2025
T&A 8.45.0.1 General Release - 21st August 2025
T&A 8.45 General Release - 9th July 2025
OneAdvanced People mobile app 1.3 release - 4th June 2025
T&A 8.44.0.0 General Release - 29th May 2025
OneAdvanced People mobile app launch - 20th March 2025
T&A 8.43.0.0 Controlled Release - 12th March 2025
T&A 8.42.0.0 General Release - 5th February 2025
T&A 8.41.2.0 General Release - 13th December 2024
T&A 8.41.1.0 General Release - 4th December 2024
T&A 8.41.0.0 General Release - 6th November 2024
T&A 8.39.0.1 Controlled Release - 17th July 2024
T&A 8.38.5.2 Controlled Release - 1st May 2024
T&A 8.39.0.0 Controlled Release - 19th June 2024
T&A 8.38.5.1 General Release - 16th February 2024
T&A 8.38.5.0 Controlled Release - 29th November 2023
T&A 8.38.4.1 Controlled Release - 2nd November 2023
T&A 8.38.4.0 Controlled Release - 1st September 2023
T&A 8.38.3.0 Controlled Release - 27th July 2023
T&A 8.38.2.0 Controlled Release - 9th June 2023
T&A 8.38.1.0 Controlled Release - 2nd May 2023
T&A 8.38.0.0 Controlled Release - 20th March 2023
T&A 8.37.4.2 General Release - 17th February 2023
T&A 8.37.4.0 Controlled Release - 20th January 2023
T&A 8.37.3.0 Controlled Release - 2nd December 2022
T&A 8.37.2.0 Controlled Release - 21st October 2022
T&A 8.37.1.0 Controlled Release - 1st September 2022
T&A 8.37.0.0 Controlled Release - 22nd July 2022
T&A 8.37.0.1 General Release - 23rd August 2022
T&A 8.36.10 Controlled Release - 9th June 2022
T&A 8.36.9.0 Controlled Release - 28th April 2022
T&A 8.36.8.1 General Release - 28th March 2022
T&A 8.36.7.1 General Release - 17th February 2022
T&A 8.36.7.0 General Release - 3rd February 2022
T&A 8.36.6.0 General Release - 16th December 2021
Got an idea?
OneAdvanced Mobile App
Contents
- All categories
- System administrator
- Auto-Rostering - User Admin/Supervisors
- Solving a Schedule
Solving a Schedule

A Schedule is only useful as a framework – the real important part is the employees and assigning them to Jobs. Schedules in Auto Rostering can be 'solved' intuitively and easily. Auto Rostering has several tools available to help you solve the puzzle of your staffing needs.
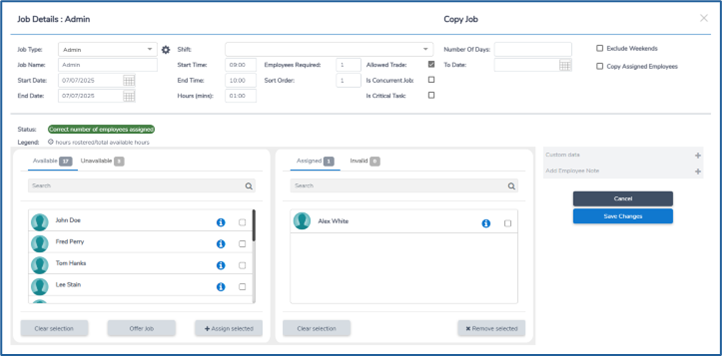
Assigning Employees
When you open a Job in a Schedule, there are two main groups of employees. These two lists will be used to Assign employees to a Job and aim to cover the required number of employees for this Job, as noted by the Employees required field in the Job.
Employees on the left-hand list are listed as either Available or Unavailable. The Available list will only be populated by employees who are valid for this Job, for example those that are not assigned to another Job in the Job's timeframe and have the required Skills. Unavailable employees are those that are unable to be Assigned because they would break one of the rules of the Job, for example their Skills do not match the requirements.
Employees in the right-hand list are Assigned to this Job. This means that they have been scheduled to work that Job within that timeframe. Employees will need to be Assigned to this Job until there are enough employees to meet the Employees Required for it. An Invalid assignation is an employee who does not fulfil some of the criteria for the Job (e.g. their Custom Data does not match), and will not count towards the Assigned total.
You can move an employee from the left to the right (and vice-versa) in several ways:
- Double click the employee
- Click and drag the employee
- Select multiple employees and select Remove Selected or Assign Selected
Overrides
While managers normally Assign employees listed in the Available list, they may wish to Assign employees who are listed in the Unavailable list. Auto Rostering will allow you to do this but will warn you of what rules the Unavailable will break. You can choose to proceed and the employee will be assigned.
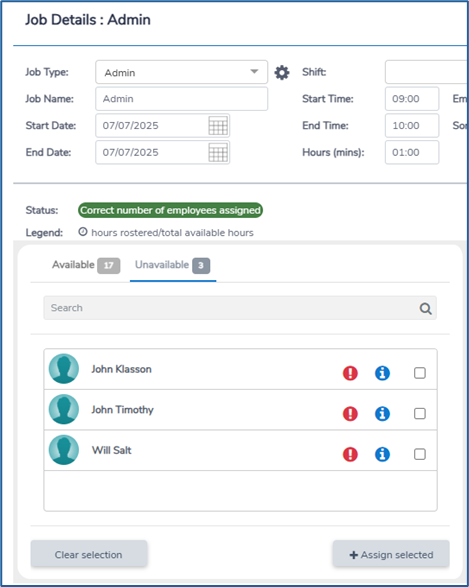
The Assignment will be clearly identifiable in the Schedule. It will display as having been an 'override' Assignment and Auto Rostering will maintain a record of the rules broken during the Assignment.
Job Status
Each Job in a Schedule will always have a current Status. The Status is determined by the amount of valid Assigned employees compared to the required number of employees, and by the Available employees. There are 6 statuses:
• Insufficient employees assigned
• Correct number of employees assigned
• Too many employees assigned
• No available employees
• Insufficient employees to meet requirement
• Correct number of employees assigned but no cover
You can view these by selecting the Legend icon on the top right hand side within the schedule.
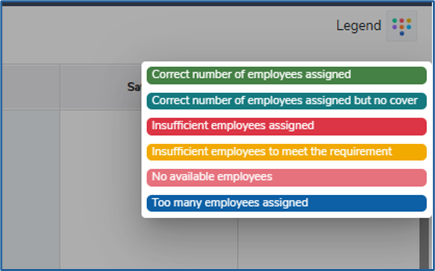
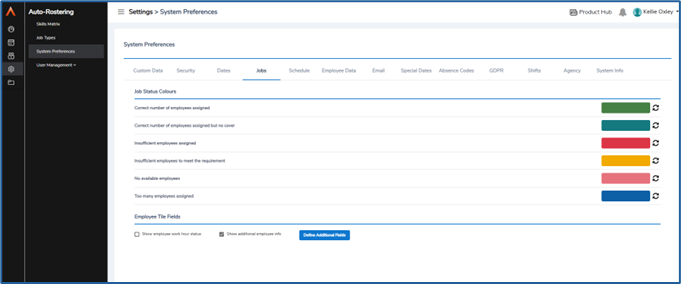
The default colour of each status can be changed in the System Preferences.
Schedule Views
Auto Rostering has many different views available for Schedules.
Calendar
The calendar view displays a column for each date being viewed and each row represents a Job Type. Job Types are groups into the Subgroups they belong to.

You can choose to view a summary or detailed view. The detailed view will identify the employees Assigned to each Job. The summary view will display all Jobs in a uniform size without showing the individual employees Assigned.
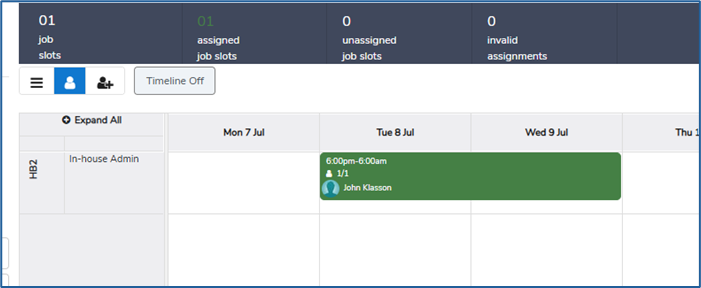
Where there are more than three overlapping Jobs in the same row and same day, the view will highlight this with an "expand" option. Expanding a day will display all Jobs on that day in the Schedule.
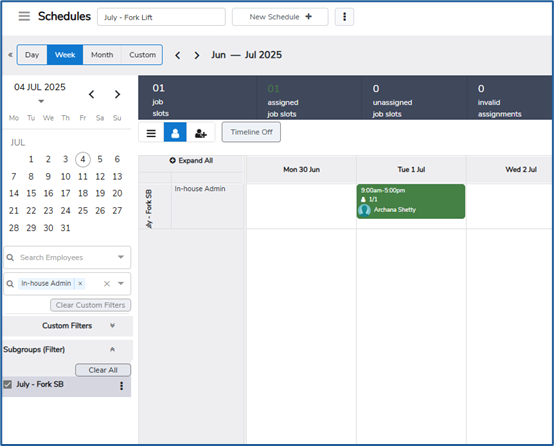
Schedule Date Ranges
When viewing a Schedule, you can quickly switch between different standard date ranged by selecting one of the available ranged from the toolbar at the top of the screen. Once a range has been selected, you can move forward and backward in equal ranged by clicking the '<' or '>' arrows.

The Custom date range option allows you to use the calendar to manually select a date range which is not a standard week, month or pay period range. You select the start date of the range and then the end date. The Schedule will then display the dates within that range (inclusive of the start and end dates). You can return to the standard day, week, month or pay period date range by selecting them in the toolbar.
You can change several preferences in the System Preferences for the date ranges:
• Start day of week allows you to choose the first day of the week
• Schedule initial range allows you to set your preferred date range, and Schedules will automatically use that date range when opened
Filters
The Schedule data that is displayed for the selected date range can be Filtered to only show a specific subset of that data. The Filter menu is on the left-hand side of the Schedule and allows for multiple Filters to be applied.
Subgroup Filters
You can choose to include or exclude subgroups from view using the Subgroup filter. The row of Jobs displayed will be restricted to Jobs in the chosen Subgroups.
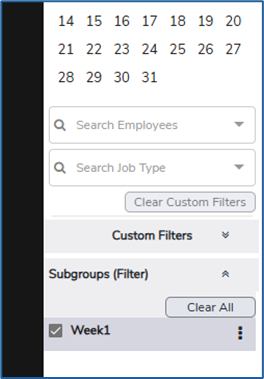
Employee and Job Type Filters
The Schedule can be Filtered by adding specific employees to the Filter. The Jobs are then Filtered to just the ones that have these employees Assigned to them.
You can also Filter what Job Types are shown in the Schedule by adding Job Types to the Filter.
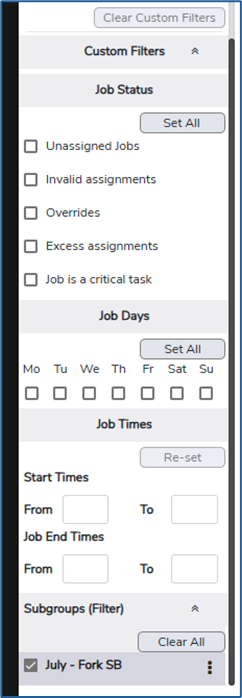
Other Filters
Additional Filters are available if you select Expand on the Filter. You can Filter by Job status, start times, end times, and days of the week. Multiple Filters can be combined to create a comprehensive view.
You can select Clear Custom Filters to quickly clear all active Filters and return the Schedule to its default view.
Toolbar Filters
The information bar displayed above the Schedule can also be used to filter the Schedule's data. Selecting either Unassigned Jobs or Invalid Assignments will Filter the Jobs displayed to only those that match that criteria.

Job Offers
The Job Offer functionality allows Managers to issue Job Offer notifications to employees. Employees can accept these Offers and the system will then automatically Assign the employee to the Job.
Offering a Job
You can Offer a Job by right-clicking on the Schedule information bar and selecting Offer Jobs. Any applicable Jobs will then be put onto the Job Offer Board
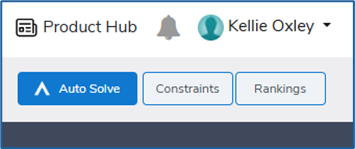
Auto Solve
Schedules can be Auto Solved – this is a powerful tool in Auto Rostering that allows you to easily Assign employees to Schedules and the Jobs contained therein. When you Solve a Schedule, Auto Rostering will consider all the different settings you have applied to a Schedule and its Jobs, Subgroups, Concurrent Jobs, Templates, Custom Data etc. and Assign employees to Jobs, giving you a one-click solution to your rostering needs. To Auto Solve a Schedule, select the Auto Solve button on the Schedule.
Agency Cover
Sometimes Jobs will be covered by sourcing resources external to your employees in Auto Rostering. The system allows you to record that Jobs have been covered in this way so that the correct Job status is maintained – this also allows you to use Reports to report on Agency Cover.
Assigning Agency Cover to a Job
In a Job's details screen, you can select Assign Agency at the bottom of the screen to apply Agency Cover. You will then need to populate the three fields:
• Agency provides a list of agencies that you have set up in System Preferences
• Reason for Cover allows you to choose a reason for needing to assign an agency worker
• Agency Worker is the name of the individual working on the Job from the agency.
Once complete, the system will assign an Agency Employee to the Assigned list for that Job. The Agency Employee Assignment will always remain valid as no Job Type or Constraint rules will prevent it.
Managing Lists
Both the Agency and Reason for Cover lists can be managed in the System Preferences page, under the Agency tab.
Read about Approving a Schedule here.