Contents
Manage Schedules

Creating and modifying a Schedule
Schedules
Schedules are a collection of Jobs that will be used to create rotas and organise your employees and assign Jobs to them. They cover a specified date range and allow you to organise your workforce accurately and efficiently – Auto Rostering can automatically work out an optimal placement of employees on this Schedule to ensure that any requirements, both at a business and an employee level, have been met.
Create a Schedule
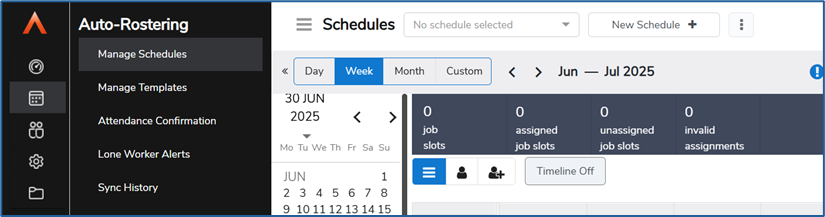
To create a new Schedule, select the Scheduler icon in the left-hand navigation pane and then choose Manage Schedules. Click the New Schedule button on the header of the page (pictured below) to create a new schedule.
The Create Schedule window will open. You will be able to select:
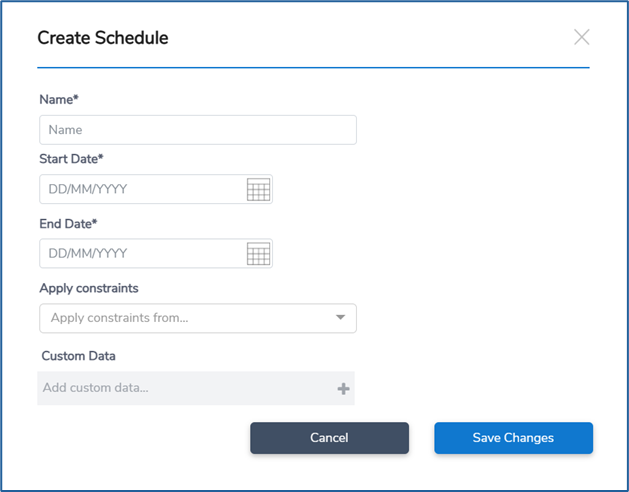
• A date range - the default is the current date, and you can adjust this range to the length of time that you want this Schedule to exist
• Custom Data – you can select which Custom Data you want to use for this Schedule, so that this Custom Data is included on all Subgroups and Jobs within this Schedule
You will also need to name this schedule, and then select Save Changes. The Schedule will then appear in the Manage Schedules page.
Modify a Schedule
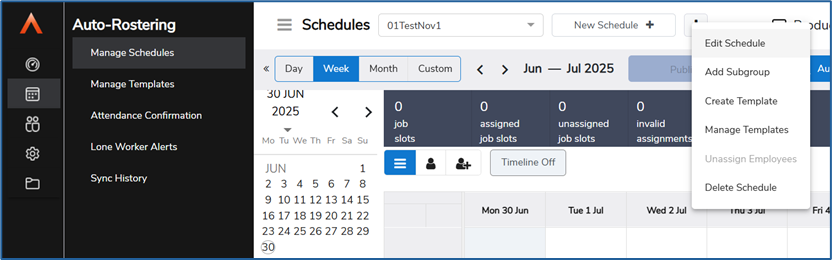
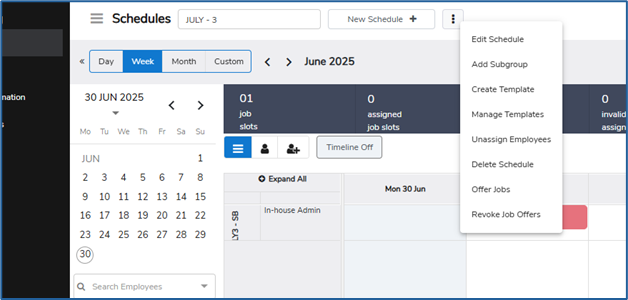
To Modify the basic details of a Schedule, you can click the 3 dots displayed next to the New Schedule button and select Edit Schedule.
The Schedule's basic information will then be displayed, and you can update them as you require. Select Save Changes to update the Schedule, or Cancel to exit without changing anything.
Copy Schedule Data
Click Edit Schedule, there is an option to copy Data. The system will copy all of the displayed data, including Jobs and Assignments, to the next applicable date range. For example, if you were displaying the first week of a Schedule, the Copy Data button would copy the data to the first week of the following Schedule.
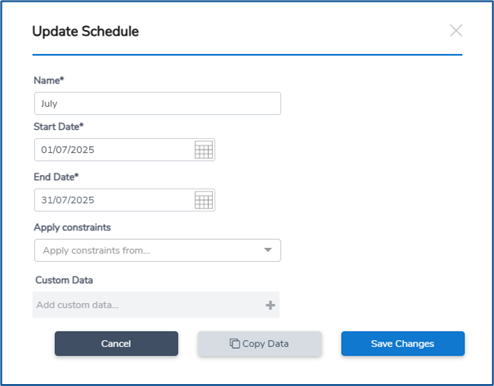
When you copy the data, it may be the case that not all of the new Assignments will have the same status as the originals. Auto Rostering will assess all the new Assignments and see if any are invalid – if they are, you will be warned of this and will need to accept the changes to continue. You can click View Details to view a more detailed breakdown of the data before deciding to proceed.
Delete a Schedule
To delete a Schedule, you can click the 3 dots displayed next to the New Schedule button and select Delete Schedule.
When you delete a schedule, you will be warned that all Schedule related data will be removed. You can either proceed with the Delete button, deleting the Schedule and all Jobs and employee Assignments, or Cancel.
Subgroups
A Subgroup is used to define collections of Jobs within a Schedule. Typically, Subgroups will be added to represent an organisation's structure (e.g. departments and sub-departments). Subgroups can have Subgroups themselves, allowing you to create a complex Schedule structure.
A Subgroup allows security to be imposed at that level, allowing you to inherit Custom Data from the Schedule and also allows you to apply Custom Data to it and therefore any Jobs within the Subgroup. A Subgroup also has several data fields associated with it which can be populated when it is created, or when you modify the Subgroup at a later time.
Add a Subgroup
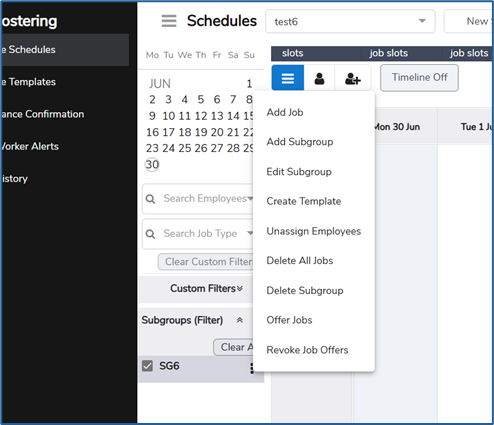
To create a new Subgroup, click the 3 dots displayed next to the New Schedule button and select Add Subgroup

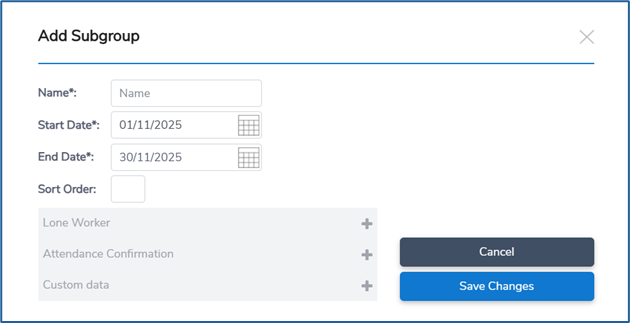
You can also add a Subgroup to an existing Subgroup by clicking the 3 dots displayed next to the Subgroup and selecting Add Subgroup

Once the add Subgroup option has been chosen from either menu, the New Subgroup screen will open. The data range and Custom Data will have been inherited from the Schedule (or its parent Subgroup). You can update this data as you desire and will also need to name the Subgroup and then select Save Changes. The Subgroup will be displayed within the Schedule.
Modify a Subgroup
To Modify the basic details of a Subgroup, you can click the 3 dots displayed next to the Subgroup and select Edit Subgroup
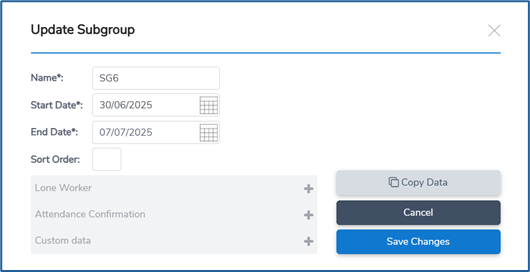
The Subgroup's basic information will then be displayed, and you can update them as you require. Select Save Changes to update the Subgroup, or Cancel to exit without changing anything.
A Subgroup's start and end date can be adjusted so they do not match the date range of the Schedule.
Delete a Subgroup
You can click the 3 dots displayed next to the Subgroup and select Delete Subgroup. After deleting a Subgroup, the Schedule will be displayed with the Subgroup no longer there.
The system will automatically delete all Jobs and employee Assignments from the Subgroup from the date of deletion. All Subgroup data before the date of deletion will remain in place and the Subgroup will still be visible in the Schedule for past date ranges.
Jobs
Jobs are the actual shifts that employees will be Assigned to. They are typically actual shifts that an employee is rostered to work, and will encompass things like the 9-5 office shift, or the evening shift as the chef in a kitchen.
Add a Job
To create a new Job, click the 3 dots displayed by the Subgroup in the Schedule filter and select Add Job from the menu.
The Create Job window will then open.
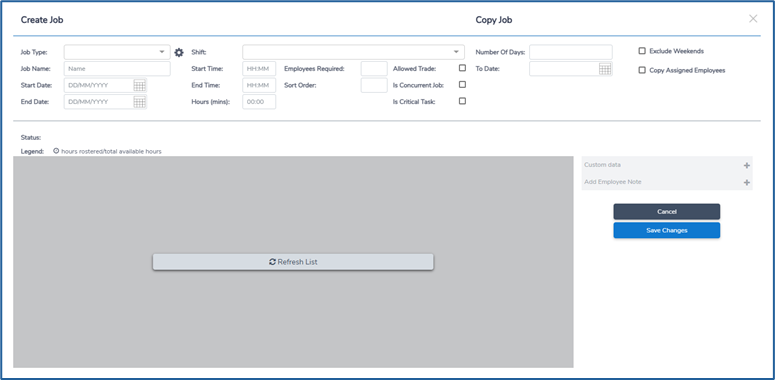
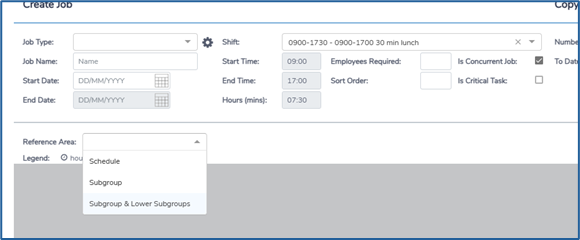
You must fill out the following mandatory fields when creating a Job:
- Job Type – You can choose a Job Type from the list that is available to you from the data synchronised from Time & Attendance. Read more about Job Types here
- Job Name
- Job Start and end date
- Job Start and end time - Hours will automatically calculate
- No. of Employees Required – the number of employees that will need to be Assigned to this Job
Other options available to select when creating a Job that are not mandatory:
- Shift - These are shifts that have been configured in Time & Attendance and have been synced through to Auto Rostering. You can read more about this further down this article
- Sort order
- Allowed trade - You can choose to allow an employee to trade this job
- Is concurrent job - Read more about this further down in this article
- Is Critical task - Read more about this further down in this article
You can also add custom data, add employee notes and assign agencies to a particular job.
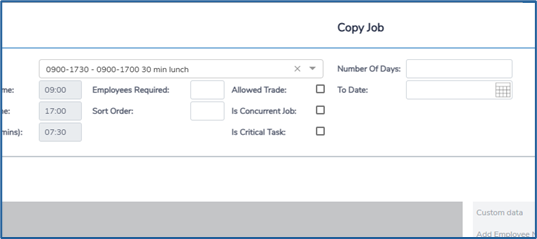
Copy a Job
A Job can be copied in several ways. When creating a Job, there are various options available to the right of the Create Job window
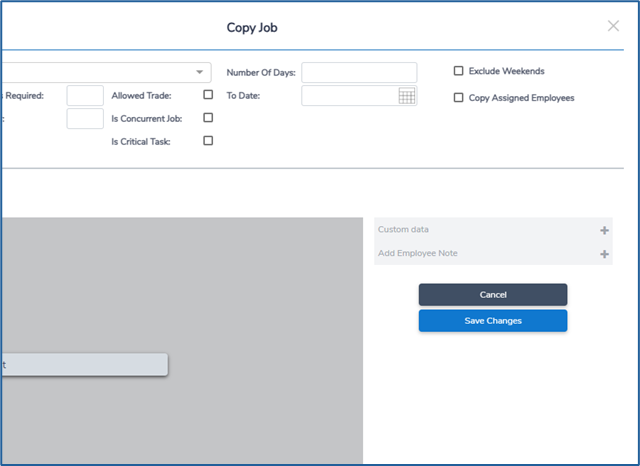
- You can choose to add a number of days to copy to the job consecutively
- You can also copy the Job to a specific date in the future
- There are also options to exclude weekends when you are copying a job and you can copy the assigned employees from the current job to the copied jobs
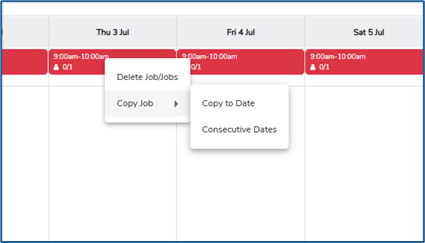
You can also right click on a Job within a Schedule and choose those same copy options
In both cases, you can choose to include or not include the employee Assignments of the initial Job that is being copied. If you choose to include the employees, any employees assigned to the Job will also be assigned to the newly created Job(s).
If you choose Copy to Consecutive Days, there are additional options to specify the number of days that the Job is copied to, and you can also Exclude Weekends. However, the days of the weekend are included in the total number of days to be copied. For example, copying a Job scheduled for a Thursday for 4 days and ticking Exclude Weekends would copy the Job to the following Friday and Monday – but not the Saturday or Sunday.
Delete a Job
A Job can be deleted in several ways. You can right click individual Jobs and chose to Delete or/and hold ctrl and select multiple Jobs on the Schedule and then select Delete all selected Jobs. You can also click the 3 dots against the Subgroup and select Delete All Jobs to delete all Jobs in that Subgroup.
Shifts
The Shifts tab within System preferences lists all the shifts that have been configured in Time and Attendance and have synced through to Auto Rostering, they have defined start and finish times. These Shifts can then be used to quickly create Jobs in Schedules by selecting a Shift instead of manually creating a Job. This allows you to create a common reoccurring Job, and then quickly placing it on a Schedule.
You cannot add shifts directly into Auto rostering as they are synced from the Time and Attendance application, however you can view the details from within System preferences.
Concurrent Jobs
A Concurrent Job is a type of Job that has many of the same attributes as the standard Jobs in your Schedule (i.e. it has a Type, a date, a start and end time, and a number of employees required), but employees are not assigned to this Job will not be made unavailable. It is an 'additional' Job that checks other Jobs during its time period for employees with a specific skill.
A Concurrent Job is used to ensure that there are employees present (i.e. assigned to another Job at the same time) during the required times of the Concurrent Job that fulfil a specific Skill requirement. An example for this might be a Concurrent Job that requires the 'First Aid' Skill. Employees are not assigned directly to it – instead, the Concurrent Job checks that another Job has an employee assigned to it with the 'First Aid' Skill. An employee will not be expected to come in and work a Job where their only duty is to perform 'First Aid' – instead, it is an additional duty on top of their regular Job.
In a Schedule, if there are enough employees assigned to other normal Jobs within the same date and time periods as the Concurrent Job, and have the required Skill(s), then the Concurrent Job requirements will be satisfied.
When a Job is set to Concurrent, it will display a timeline that shows where the Skill has been covered and where it has not been covered. Covered times are highlighted green, uncovered times are highlighted red. Selecting any of the green bands will display the list of employees assigned to other Jobs who have a matching skillset for the Concurrent Job.
You can also decide if a Concurrent Job will only select employees from certain Schedules and Subgroups using the Reference Area drop-down menu within the Job details screen
Critical Tasks
Any Job can be marked as a Critical Task. A Critical Task is a Job where a user must assign all required employees. If a Critical Task in a schedule does not have all of the required employees assigned, then it cannot be Submitted for approval.
Constraints
Constraints are used to limit the employees that are available for Jobs. Each Schedule can have multiple Constraints added to it.
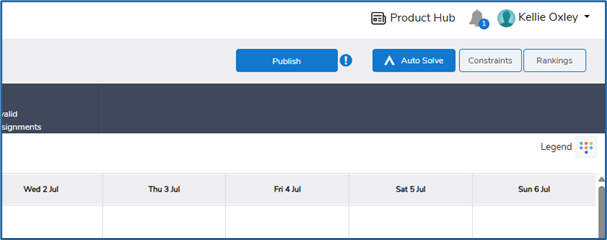
Constraints are managed within each individual Schedule and are accessed through the Constraint button in the toolbar:

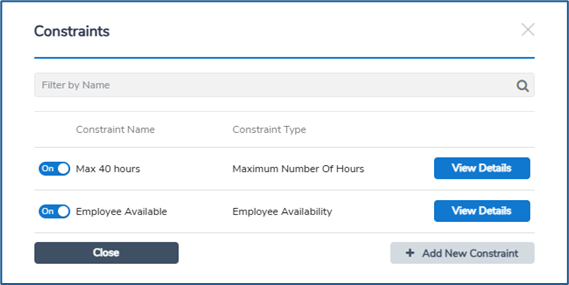
The Constraints screen lists any existing configured Constraints and has options to switch them on/off, View details where you can edit and the ability to Add new Constraints.
Add a Constraint
To add a Constraint, click the Constraints button on the right hand side of the top toolbar within the schedule.
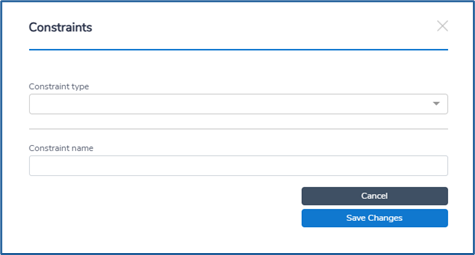
There is a list of pre-defined Constraint types to choose from. Once you select a type, Auto Rostering will display a screen where you can configure the Constraint to the requirements of the type you chose.
You will also need to give a unique name to the Constraint. Save the Constraint, and it will then be added to the list of existing Constraints and be applied to the current Schedule.
Modify a Constraint
Existing Constraints can be modified at any time. Open the Constraints window, and then select View Details next to the Constraint you wish to edit. You can edit any of the values, and then save it again. The newly modified Constraint will be applied to the Schedule.
Delete a Constraint
Existing Constraints can also be deleted at any time. Open the Constraints window, and then select View Details next to the Constraint you wish to delete. Select Delete, and the Constraint will be removed from the list and will no longer be applied to the Schedule.
Activating/Deactivating a Constraint
Constraints can be marked as either Active or Inactive. This allows you to turn off a Constraint for a Schedule without deleting it.
Each Constraint in the Constraints window has an on/off toggle to allow you to switch them on or off.
Rankings
Rankings are used to configure the sort order of the employees in the Available Employees list. Each Schedule can have multiple Rankings applied to them.
Rankings are managed within each Schedule in the Rankings window, which can be opened by selecting Rankings in the toolbar on the Schedule screen:
The Rankings screen lists any existing configured Rankings and allows you to edit and add new Rankings.

Add a Ranking
When adding a new Ranking, you will need to select which type of Ranking it is from the options available. Once you select the Ranking type, you will then need to configure the options presented to you for that type (each type will have its own options).
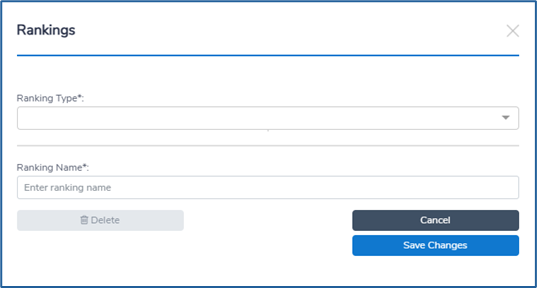
Finally, give the Ranking a unique name and save it. The Ranking will be added to the list of existing Rankings and will be used for that Schedule.
Modify a Ranking
Existing Rankings can be modified at any time. Select the View Details option next to any Ranking in the Ranking window to edit it. Once you have made the changes, select Save, and the modified Ranking will be applied to the Schedule.
Delete a Ranking
Rankings can be deleted at any time. Select View Details from the Rankings window and then select Delete in the details window. The Ranking will be removed from the list and will no longer be applied to available employee lists.
Activating/Deactivating a Ranking
Rankings can be marked as either Active or Inactive. This allows you to turn off a Ranking without deleting it.
Each Ranking in the Ranking window has an on/off toggle to allow you to switch them on or off.
Ranking Order
When multiple Rankings are active, the priority applied to each is determined by the order they are listed in in the Ranking window. You can drag and drop a Ranking to move it up or down the list to change the Ranking's priority, by clicking the 3 vertical dots displayed to the right of View Details and dragging into the correct priority.
Templates
Templates allow you to create pre-defined reusable Schedule blocks. These Templates can be inserted into a Schedule as needed. They allow you to quickly build both one-off and repeating Schedules using these as building blocks.
Create a Template
To create a Template from an existing Schedule, you need to open the Schedule and select Create Template when you click the 3 dots on the Schedule or Subgroup menu.
All Schedule Job and Subgroup data within the currently displayed date range will automatically be included in the new Template. Additionally, you will be prompted to decide if you wish to include employee Assignments and Custom Data from the Schedule in the new Template.
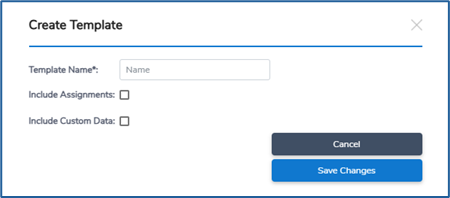
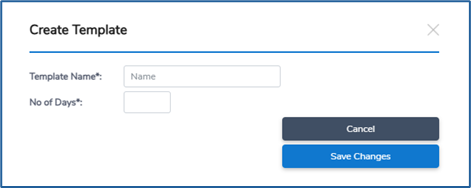
To create a new Template manually, open the Manage Templates page from the left-hand navigation pane and select Add Template displayed at the top right hand corner of the toolbar:
You will then need to give your new Template a name and choose how many days to include.
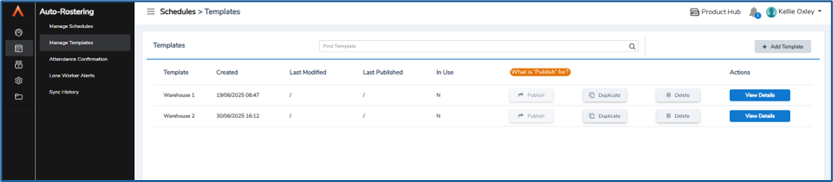
This Template can now be accessed from the Template list under Manage Templates, Select View Details to access the Template and you can add Jobs to the Schedule as if it were a normal Schedule. Once you are happy, click Save changes.
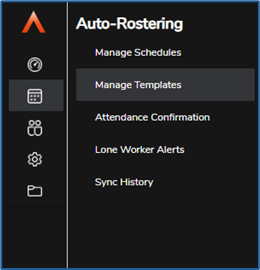
Accessing and Editing a Template
Templates are accessed from the Manage Templates menu in the left-hand navigation bar. You can select any existing Templates and view its details.
The Templates details screens are very similar to the main Schedule display. You can view different date ranges, add Jobs and Subgroups in the normal way, add Filters, and so on.
A key difference between a Template and a Schedule is that the date columns are labelled "Day 1", "Day 2" and so on. A Template is simply a building block a certain number of days in length, and these days will be replaced with actual dates if a Template is used for a Schedule.
Managing Templates
Sometimes, it may be necessary to change the details of the underlying Template Data after it has already been inserted into a Schedule. You do not need to manually remove the Template from Schedules, update it, and then insert it once again.
Instead, you can use the Publish button after you have updated a Template to push the updates out to any Schedules containing the Template. Like the Delete button, you can choose to either do this immediately or from a certain date.
Using a Template
To use a Template in a Schedule, open the relevant Schedule and select Manage Templates from the Schedule menu using the 3 dots:
From the Templates window, you can insert, delete or update a Template.
To insert a Template, select Insert Template. You will then be prompted to select a Template and specify a location, start date and rotations:
- The Location is where the Template displays within the Schedule – for example, a Template inserted at the top level of the Schedule will result in the Subgroups displaying directly under the Schedule. Inserting a Template into a lower pre-existing Subgroup will result in the Subgroups of the Template displaying under that Subgroup.
- The Start Date will determine the date that the Template starts on within the Schedule. If you choose 01/01/2022, "Day 1" of the Template will be on 01/01/2022, and so on.
- The Rotation value is optional. If left at '1', the Template will display for the number of days contained within the Template, and then stop. Each rotation is another repetition of the Template – if you choose three rotations on a 5-day Template, then 15 days within the Schedule will be filled out by the Template. If the Schedule is likely to be repetitive, the rotations option is a very useful way to pre-populate Schedules with future data, avoiding the need to re-create it week to week.
Templates can be created and managed at any time from the Manage Templates screen. If you need to delete a Template, you can click Delete Schedule, and you will choose to either Delete Now or Delete From. Choosing Delete Now will immediately remove the Template data from any Schedules it is in from the current date. Delete From will allow you to set a date to delete the Template and any data it has in Schedules.
Read the next article for help Solving a schedule here.